Camera Group Settings
This topic covers the system administrator's ability to map users to camera groups for the VMS system used by LaunchPoint.
The VMS Setting allows a system administrator to "map" users to cameras in the VMS system that are programmatically linked to readers in the LaunchPoint system. Once the Camera Group is created, the administrator can modify or delete it.
FEATURED TOPICS
Remove Cameras from a Camera Group
Create a User-Camera Group
This section describes how to create a new Camera Group by mapping one or more cameras to a user name.
-
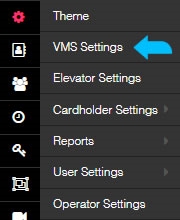
Click on the Settings icon on the side menu and choose VMS Settings.
-
The User Camera Mapping page will open.
Result: The page has 3 columns (User Select List, Camera Select List, and Mapped List of User-Camera Groups ).
NOTE: The page has inclusive search fields at the top of each column.
( Inclusive search means if you enter "d" in the search field, it will include ever person with the letter D in their name - even if it doesn’t start with D.)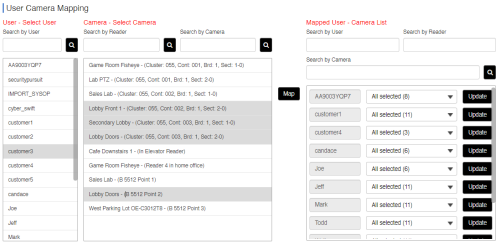
-
First, select (click) a user name in the first column to begin creating the Camera Group.
[ HINT: clicking the user name a second time will deselect it. ]
-
Next, select (click) the individual Cameras(readers) from the second column to choose it for the group.
[ HINT: you can click more than one camera to give the user access to multiple cameras (shown above). ]
[ HINT: to deselect a camera, click the camera a second time. ]
-
Click the Map button to assign the group of cameras to the user.
-
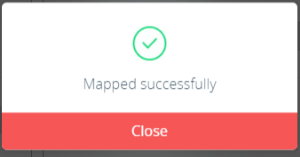
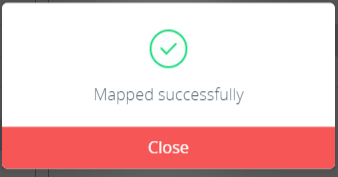
Click Close on the User Confirmation message.
Result: This message confirms your Camera Group is created.
-
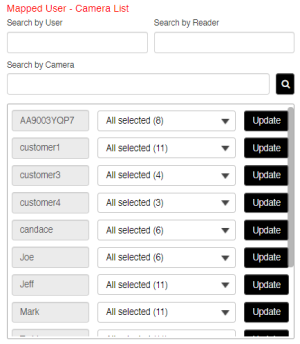
The new User-Camera Group is created and added to the Camera Groups list (3rd column).
[ HINT: you can see the total number of cameras in the parentheses. ]
[ In our example four "(4)" cameras belong to the user named 'Customer 3'. ]
-
You can close the page if you are finished or choose other options.


OTHER OPTIONS
Add Cameras to a Camera Group
This section describes how to add more cameras to an existing User-Camera Group (a.k.a Camera Group).
REQUIREMENT
-
The user's Camera Group must already be created.
-
If you have not yet created the camera group, see Creating Camera Groups.
STEPS
-
Click on the Settings icon on the side menu and choose VMS Settings.
-
The User Camera Mapping page will open.
-
First, select (click) the user name in the first column that you want to add cameras to.
[ HINT: If you made a camera group for a user (Customer 3) and you want to add more cameras, then you will select the same username again in the first column. You might thing you are creating a new group, but if the user already has a group, this will just add cameras to the existing group's camera list.]
-
Next, select (click) the individual Cameras(readers) from the second column that you want to add to the existing camera group.
[ HINT: you can click more than one camera to give the user access to multiple cameras (shown above). ]
[ HINT: to deselect a camera, click the camera a second time. ]
-
Click the Map button to assign the group of cameras to the user.
-
Click Close on the User Confirmation message.
Result: This message confirms your Camera Group is created.
-
The existing User-Camera Group is updated and the additional cameras are added to the Camera Groups list (3rd column).
[ HINT: you can see the total number of cameras will increase in the parentheses. You can see new cameras in the list. ]
-
You can close the page if you are finished or choose other options.
OTHER OPTIONS
Remove Cameras from a Camera Group
This section describes how to remove cameras from a User-Camera Group (a.k.a update the camera list in a Camera Group).
STEPS
-
Click on the Settings icon on the side menu and choose VMS Settings.
-
The User Camera Mapping page will open.
NOTE: The page has inclusive search fields at the top of each column.
( Inclusive search means if you enter "d" in the search field, it will include ever person with the letter D in their name - even if it doesn’t start with D.)
-
(optional) If your User/Camera List (3rd col.) is too long, you can use the search fields (above) to narrow your list.
-
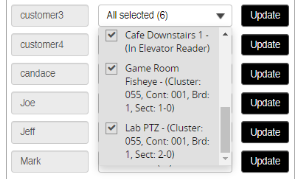
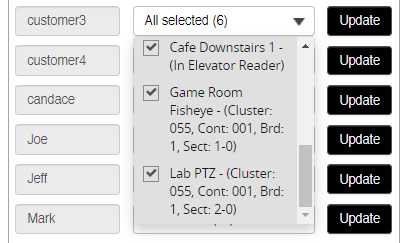
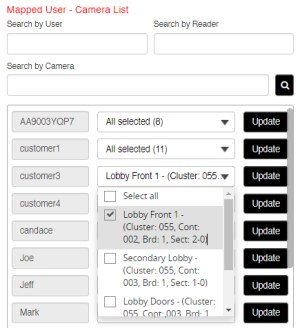
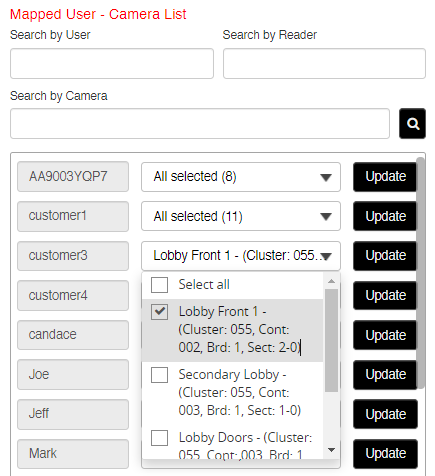
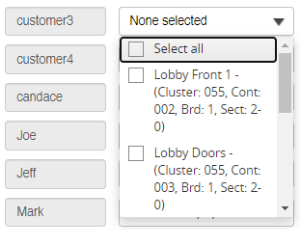
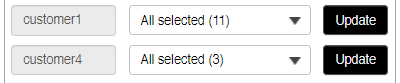
Select (click) the camera list dropdown field beside the user's name that you want to change.
Result: the Camera droplist will open and show a list of the assigned cameras.
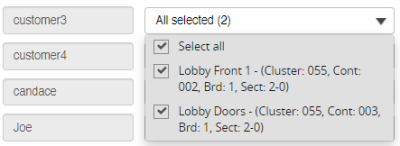
[ In this example there are 2 cameras in the list. The select all is a 'toggle checkbox' to select all or deselect all. ]
-
"UNCHECK" a camera(s) you want to remove from the authorized camera list.
(Leave the cameras 'checked' that you want to keep in the group.)Result: the chosen checkbox will be empty to remove the camera.
[ checked = keep / unchecked = remove ]
-
Click the UPDATE button to update or save your changes to the camera list.
Result: LaunchPoint will prompt user to confirm the choices.
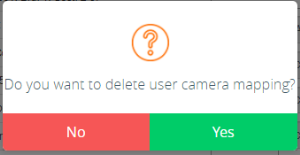
[ Yes = update (changes will be saved). No = cancel update (no changes will be saved) ]
-
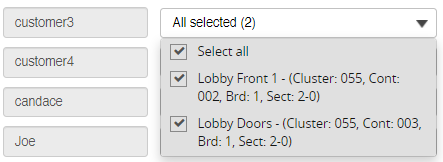
The Camera List dropdown will reflect the changes you made.
Result: The Camera dropdown list will indicate the number of cameras now in the list.
[ In this case, the user kept 2 cameras in the group. ]

-
You can close the page if you are finished, or you can go to other options.

OTHER OPTIONS
Delete a Camera Group
This section describes how to delete the entire Camera Group from the VMS Settings Camera Group list.
STEPS
-
Click on the Settings icon on the side menu and choose VMS Settings.
-
The User Camera Mapping page will open.
NOTE: The page has inclusive search fields at the top of each column.
( Inclusive search means if you enter "d" in the search field, it will include ever person with the letter D in their name - even if it doesn’t start with D.)
-
(optional) If your User/Camera List (3rd col.) is too long, you can use the search fields (above) to narrow your list.
-
Select (click) the camera list dropdown field beside the user's name that you want to change.
Result: the Camera droplist will open and show a list of the assigned cameras.
[. The select all is a 'toggle checkbox' to select all or deselect all. ]
-
"UNCHECK" the Select All option which will uncheck all the camera(s) in the list.
Result: all checkboxes will be empty.
[ checked = keep / unchecked = remove ]
-
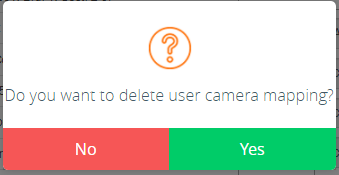
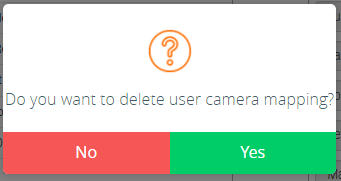
Click the UPDATE button and click Yes to update or save your changes to the camera list.
Result: LaunchPoint will prompt user to confirm the choices.
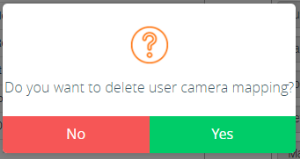
[ Yes = update (all cameras will be deleted). No = cancel update (no changes will be saved) ]
-
The Camera List dropdown will reflect the changes you made.
Result: The Camera Group is removed from the list (col 3).

-
You can close the page if you are finished, or you can go to other options.

OTHER OPTIONS
End of VMS Settings section.