Handling Alarms
This topic covers setting up and monitoring real-time Alarm Events and as well as sending User Commands.
FEATURED TOPICS
About Alarm Events
An Alarm Event is simply a hardware event that is elevated programmatically to be a system alarm. The alarm events are produced by hardware activity from inputs that are being monitored.
Alarm Events are not events from a third-party alarm panel. Events from third-party alarm panels are logged in the Live Events Page and are configured in the Settings Window.
The user must configure which hardware device(s) to see alarms from. This is done in the Alarm Settings window (modal). See the next section.
Once the Alarm Settings are configured, the user can handle the incoming alarm events as they occur. Alarm events display in a popup window (modal) in the foreground of the Events page. User cannot interact with the incoming events while the Alarm Events popup is open. User must resolve the alarms to return to the Events page.
Configure Alarms (Activation Settings)
Configuring alarm events is done in the Alarm Settings window (modal).
The Alarm Settings window allows the user to build alarm sets to monitor selected hardware for specified events.
The user will choose a device type, then select the individual devices, and finally pick which events to see. The user can add as many alarm sets as needed.

PREREQUISITES & NOTES
-
Users must have the appropriate account permissions to view events and alarms (configured by system administrators).
-
Users must have permissions and a VMS system login/account to be able to view video from linked cameras.
-
You must enable the Hardware Types and Devices (readers, inputs, controllers, alarm panels) you want to monitor from the Alarm Activation Settings window.
-
You must enable the actual event messages you want to see in the Alarm Activation Settings window.
OPEN THE EVENTS PAGE
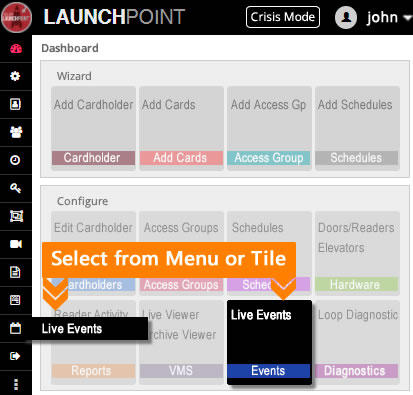
There are two ways to open the Live Events page ...
-
Side Menu: select "Live Events" option.
-
Dashboard: select 'Events' Tile (under Configure section)

OPEN THE ALARM SETTINGS WINDOW
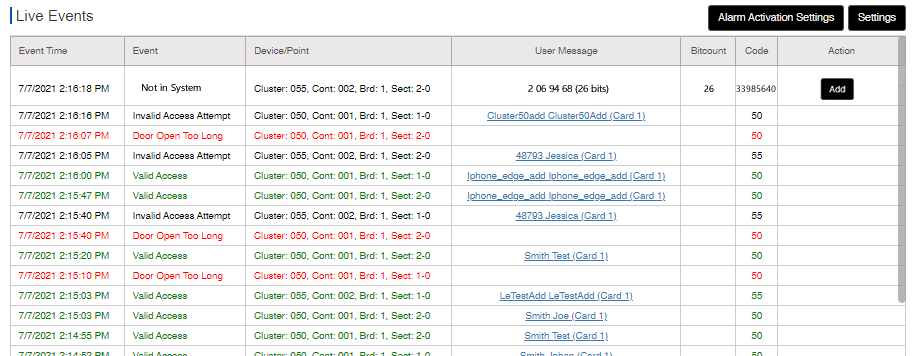
When the Live Events page opens, the user can click the Alarm Activation Settings button at the top-right corner of the Events page.

Note: No alarms will display if the user has never configured the alarm sets. After the alarm sets are created, the appropriate incoming alarms will display as they occur in the system.
ALARM SETTINGS
The Alarm Activation Settings window allows user to choose which hardware to monitor and which alarm types to display.
STEPS
-
Click the Alarm Activation Settings button in the Event page (top-right corner) to open the window.
(The Alarm Settings window (modal) will open.) -
Click the Plus button in the Alarm Settings window to add an alarm-set.
(An alarm-set will be added to the screen.) -
Select (check) a Hardware Type that you want to create an alarm-set for (1st droplist).
The choice you make in the Type field controls how the Device and Events lists are populated.
"TYPE" DROPLIST
-
Readers = populates the Device and Events droplists to show choices for readers.
-
Inputs = populates the Device and Events droplists to show choices for inputs.
-
Controllers = populates the Device and Events droplists to show choices for controllers.
-
Alarm Panels = populates the Device and Events droplists to show choices for alarm panels (3rd party).

-
-
Select (check) any Hardware Devices that you want to monitor (2nd droplist).
-
The Device droplist is populated based on the Hardware Type you chose in the 1st field (prior step).
For example: All the readers in your system are listed if you chose "Reader" in the Type field.
-
Use the "Select All" option to toggle the checkboxes (all on or all off ).
"DEVICE" DROPLIST
-
Readers = list of all the readers in the system.
-
Inputs = list of all inputs in the system.
-
Controllers = list of all the controllers in the system.
-
Alarm Panels = list of all alarm panels in the system.
-
-
Select (check) any Events that you want to see (3rd droplist).
-
The Events droplist contains a list of events that correlate to the chosen Devices.
For example: Reader events are listed if you chose "Reader" in the Type field.
-
Use the "Select All" option to toggle the checkboxes (all on or all off ).
"EVENTS" DROPLIST
-
Reader Events = "check" the specific reader/door events - [e.g. Door Forced, Invalid Access, etc. ]
-
Input Events = "check" the specific input events - [e.g. Armed Alarm, Armed Secure, etc.]
-
Controller Events = "check" the specific controller events - [e.g. Board Offline, Tamper, Low Battery, etc. ]
-
Alarm Panels = "check" the specific AP events - [e.g. Point Bypassed, Trouble, A/C Fail, etc.]
-
-
To add another alarm-set, repeat steps 2 thru 5 - as many times as needed.
-
Click the Save button to save your alarm-sets when ready.
The Close button in the Settings window will close the window without saving your changes.
-
Close the Save Success popup message to begin monitoring alarms.
-
RESULT: alarm event messages that you selected will start logging based on your alarm settings.
EVENT MESSAGES
-
Invalid Access Attempt = access denied - card presented does not have access to this door.
-
Valid Access = access granted - card presented has valid access to this door.
-
Door Open too Long = the door contact was not closed before the reclose within timer expired.
-
Door Forced = door contact was opened without having a valid access granted.
See the main system programming guide for all types of events that are possible. -
Not in System = access card presented to the reader is not in the system.
See User Commands for more information on the Add button.> Note: to see NIS events, the "Not in System" Event Type must be "checked" in the Settings window.

-
Monitoring Alarm Events
The Alarm Events window allows the user to handle incoming alarm events in a real-time capacity.
Alarm events are continuously logged to the Alarm window as they occur.
STEPS
-
Open the Live Events page from the side menu or dashboard tile.

.
-
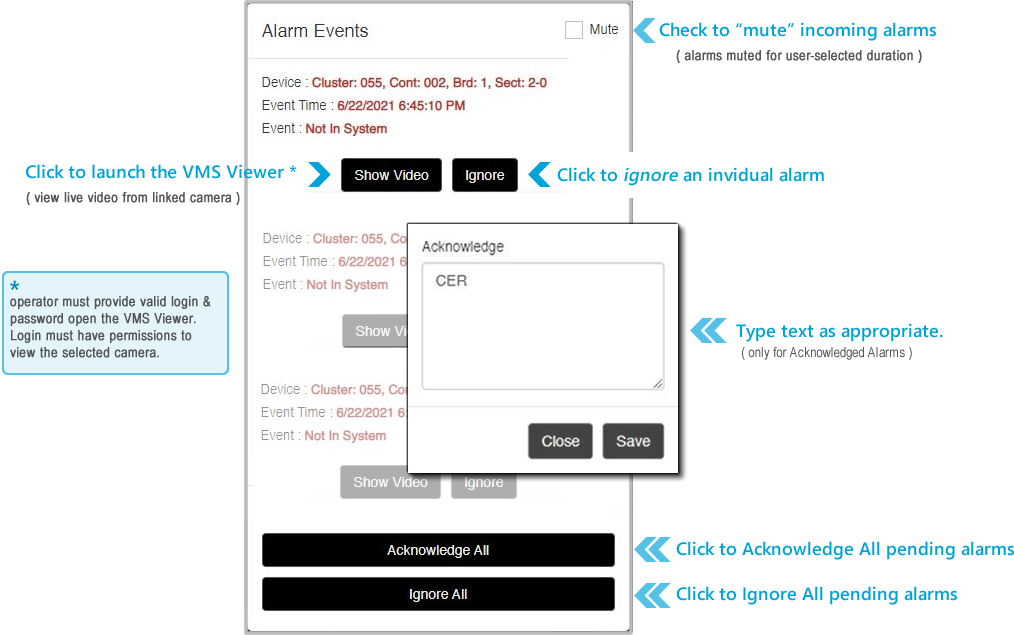
The Alarm Events popup window will open as soon as alarm events occur in the system.
These pending alarms will continue to fill the alarm queue.-
The user can resolve alarms by ignoring or acknowledging them.
-
Ignoring/Acknowledging an alarm removes it from the active list and silences its audible beeping alert.
-
User may be prompted to enter a resolution text in the Acknowledge popup (configurable).

-
NOTE: User commands are issued from the User Command buttons. See below.
ACKNOWLEDGE OPERATOR FEEDBACK
An programmable option can be configured to allow or require the user to enter a text message to provide system notes about the alarm.
-
When an alarm event comes in, click Acknowledge All button. The Acknowledge popup will open.
-
Type the appropriate text message into the textbox.
-
Click the Close button to clear the queued alarm event(s) and silence their correlating audible beeping alarms.
All the alarm events that were queued after the user clicked the Acknowledge button, will be not cleared or silenced.
NOTICE: Any audible alarms for events that were in the queue after the Acknowlege button was pressed, will continue sounding.
OPERATOR COMMANDS
While the Alarm Events window is open, the user can issue user commands by clicking the command buttons.
STEPS
-
While alarm events are logging, click on any command button in the Alarm window.
Note: As you resolve one alarm, newer alarms could be logging. The user command applies only to the selected or active alarm.
-
Select (choose) the appropriate command button ...
COMMAND BUTTONS
-
IGNORE = clears only the chosen alarm and silences the associated audible beeper.
-
IGNORE ALL = clears all alarms currently queued and silences the associated audible beepers.
-
ACKNOWLEDGE ALL= clears all alarms currently queued and silences the associated audible beepers.
-
SHOW VIDEO = opens the VMS Page and displays the live video from the associated camera for the device causing the alarm event. (User will be prompted to sign-in to the VMS system.)
-
-
While alarm events are logging, click on any command button in the Alarm window.
NOTICE: As you resolve one alarm, newer alarms could be logging. The user command applies only to the selected or active alarm.