One Time Scheduled Action
This topic describes how to create Scheduled Actions in the One Time Schedule screen.
FEATURED TOPICS
Remove multiple Scheduled Actions
Create a Scheduled Action
The One-Time Schedule page allows a user to create a Scheduled Action for a selected Door/Reader, Input, or Output device. When scheduling the action, you can choose the frequency or behavior of the action.
RULES OF OPERATION
The following scheduled actions can be configured from the One-Time Schedule page.
-
Create a Door Action (lock, unlock, enable, disable)
-
Create an Input Action (shunt, unshunt, enable, disable)
-
Create an Output Action (on, off, enable, disable)
-
Assign a Behavior (frequency) (one-time-only; every #hours; every #minutes; or on select weekdays)
-
Assign a date and time for the action to happen.
-
Remove or delete an action or multiple actions.
PREREQUISITES
- The user login account must have the appropriate security-level to open the page.
OPEN THE ONE-TIME SCHEDULE PAGE
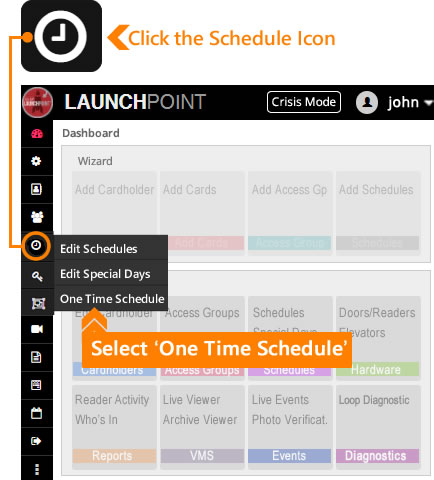
You can open the One-Time Schedule page from the side menu by clicking the Schedule icon.

CREATE A SCHEDULED ACTION
To create a scheduled action you must choose a device and set the frequency for the schedule "behavior".
Action Frequency (Behaviors droplist)
-
one-time-only
-
repeat every # hours
-
repeat every # minutes
-
repeat on selected weekdays
Device Actions
-
Door/Reader = Lock/Unlock, Disable/Enable, Relay-2 ON/OFF, Pulse
-
Inputs = Shunt/Unshunt, Disable (service mode)/Restore)
-
Outputs = Turn ON/OFF, Disable/Enable
STEPS
-
Select the desired Loop/Cluster at the top left of the page.
-
Select the desired Device Type (Readers/Doors, Inputs, or Outputs).
-
Select the Device - (this list is filtered to show only the devices in this Cluster of the Type you chose in the prior step).
-
Select the Action - (this list is filtered based on the Device Type you chose).
-
Select the Date and Time that you want the action to happen using the calendar feature.
-
Select the Behavior - (this is the frequency that you want the action to happen).
-
Click the [Add to Scheduled Actions] button to add the item to the Scheduled Actions list.
-
Click the Save button to save your changes.
RESULTS: the action you created will be saved.
Closing the page without saving will cancel your changes.
Delete a Scheduled Action
The user can remove a Scheduled Action in LaunchPoint from the One Time Schedule page.
STEPS
-
From the Menu Bar, click on the Schedules icon and choose one time schedule option.
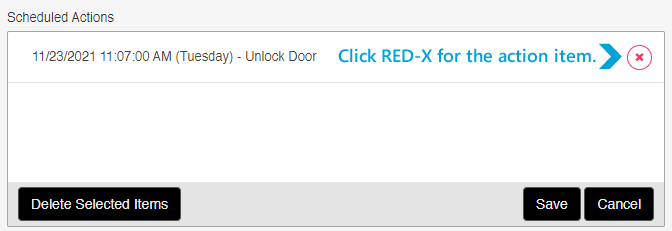
RESULT: The Scheduled Actions list-view will display the Actions that are currently scheduled.
-
Click the Red X beside the desired Scheduled Action to delete it from the list-view.

-
Clicking the Save button will save your changes.
-
Click the Save to save your changes.
-
Click the Cancel to cancel your changes.
-
-
When you save, LaunchPoint should display a success confirmation.
Remove multiple Scheduled Actions
The user can remove multiple Scheduled Actions at the same time from the One Time Schedule page.
STEPS
-
From the Menu Bar, click on the Schedules icon and choose one time schedule option.
RESULT: The Scheduled Actions list-view will display the Actions that are currently scheduled.
-
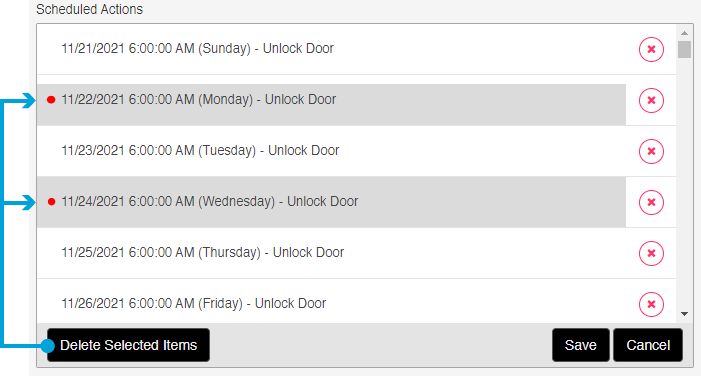
Select more than one action by single-clicking on each item you want to delete.
RESULT: Each action item will be highlighted gray when selected.

-
Click the Delete Selected Item to delete the selected items from the system.
-
Click the Save button to save changes.
-
Click the Save = to save your changes.
-
Click the Cancel = to cancel your changes.
-
-
When you save, LaunchPoint should display a success confirmation.