Install Milestone XProtect Plugin
This topic covers installing a Video API Plugin for Milestone XProtect 64bit Video Management System (VMS). Instructions include installing the Middleware Service, the VMS unit login credentials, connecting to the VMS, and importing the camera names.
FEATURED TOPICS
Milestone XProtect Video Plugin (Server)
This step describes installing the Video Plugin file on the computer that hosts the Galaxy GCS Services.
PREREQUISITES
-
Verify GCS Web API Service is running:
Test URL > http://localhost:8000/swagger or https://X.X.X.X:8334/swagger (SSL)
-
The MilestoneXprotect.exe plugin install file is under the Auxiliary folder on the Galaxy Install media (USB/ISO).
Path > USB:\\Auxiliary\System Galaxy\Video Plugins\MilestoneXprotect
STEPS
-
Copy the MilestoneXP.exe file into the milestone XP folder on the Galaxy Services Computer.
NOTE: you must create the Milestone XP folder if it does not exist.
Your PC > C: \\GCS\System Galaxy\Video Plugins\MilestoneXprotect
-
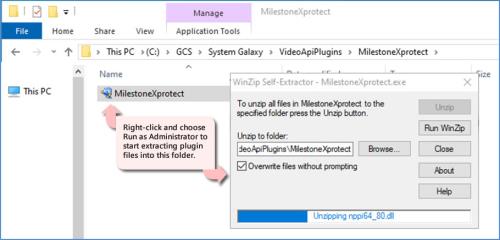
Right-click on the MilestoneXprotect .exe file and choose ‘Run as Administrator’ from the menu.
The plug-in exe should self-extract.
Extracting Video Plugin file
Install Middleware Connector Service
This step covers installing the Middleware Connector Service on the computer that hosts the GCS Services.
PREREQUISITES
-
The Middleware Connector service must be installed on the same computer that is hosting the GCS Services.
-
Galaxy’s GCS Web API Service must be running, or the Middleware Connector will not install.
STEPS
-
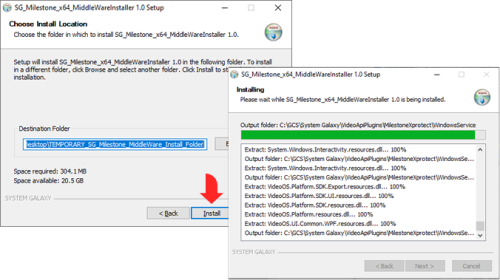
Browse to the SG Milestone x64 MiddleWare Installer (.EXE file) on the computer running GCS services.
C:\\GCS\System Galaxy\Video Plugins\MilestoneXprotect\Installers\SG_Milestone_x64_MiddleWare_Installer.exe
-
Right-click the Middleware Installer EXE file and choose to ‘Run as Administrator’.
-
The Installer program will open, click NEXT to begin.
-
You can accept default temp folder location (desktop).
NOTE: The installer will remove the temp folder after it finishes installing.
-
Click Install button (see figure below).
Installing the Milestone Middleware
-
Click FINISH when you are done.
-
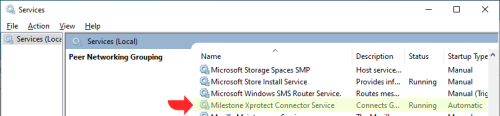
Open the PC Services window, verify the status of the ‘Milestone Xprotect Connector Service’ is “Running” and is configured to “Automatic” startup.
Milestone service status is Running/Automatic
Install Video Plugin (Client)
This step covers installing the video plugin file on a Galaxy client workstation.
You can skip this step if you do not need Video at a client workstation.
PREREQUISITES
-
The GCS Web API Service must be running.
-
The GCS Services Computer must be online.
-
The options that are related to Video Viewing and Monitoring must be enabled at this client. Refer to the Setup Checklist Item-4 in for details.
STEPS
-
Copy the MilestoneXP.exe file into the milestone XP folder on the Galaxy Services Computer.
NOTE: you must create the Milestone XP folder if it does not exist.
Your PC > C: \\GCS\System Galaxy\Video Plugins\MilestoneXprotect
-
Right-click on the MilestoneXprotect .exe file and choose ‘Run as Administrator’ from the menu.
The plug-in exe should self-extract.
Extracting Video Plugin file
Connect to VMS & Import Cameras
This step describes adding a VMS Unit and client login to Galaxy, and importing the camera names.
PREREQUISITES
-
The VMS Unit must already be installed, configured and online.
-
The VMS client login for Galaxy must already be created at the VMS Unit and must have the correct permissions to view all cameras.
-
All camera names must be configured at the VMS unit before you add the VMS to System Galaxy.
-
The GCS Web API Service and the MilestoneXprotect Connector Service must be running.
-
You must know the IP Address of the VMS Unit (or web address if hosted over the internet)
-
You must know the VMS’s client login credentials (Username/Password).
IMPORTANT: Camera names cannot be changed in System Galaxy. Camera names must be configured at the VMS Unit before they are imported into System Galaxy when the VPI Programming is done (this step). The imported names will display in screens and reports throughout System Galaxy, including the SG Hardware Tree, Reader Programming screen, Input Programming screen, and the GCS VPI Video Viewer. TIP: Create camera names that are useful - like what area it shows - e.g., lobby mezzanine, east parking lot, employee entrance, elevator lobby cam1.
STEPS
-
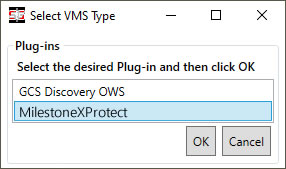
Open the Plugin Screen - Configure > Hardware > DVR’s > Video Plugins
-
In the Plugins window, select “MilestoneXprotect” and click OK to open the VMS Programming screen.
-
Enter a unique and meaningful Name (i.e. “MilestoneXP 01”).
FYI: This name is displayed throughout the screens and reports in System Galaxy - such as Hardware Tree, DVR Properties, Camera Programming, or Reader & Input screens, etc.
-
Enter client login credentials (User or Domain & Password). Login rights must allow viewing/controlling cameras.
-
Enter the Web Services URL of the VMS unit (port number is not needed).
-
Click the [TEST] and [SAVE CONNECTION] buttons, which will test the connect and import the camera names.
-
Click [SAVE SYSTEM DATA] button, to save VMS connection settings and camera names into the SG database.
IMPORTANT: You must restart System Galaxy software after saving data to initialize the VPI system configuration.
VMS Programming & Camera Import - DEFAULT PORT = NONE
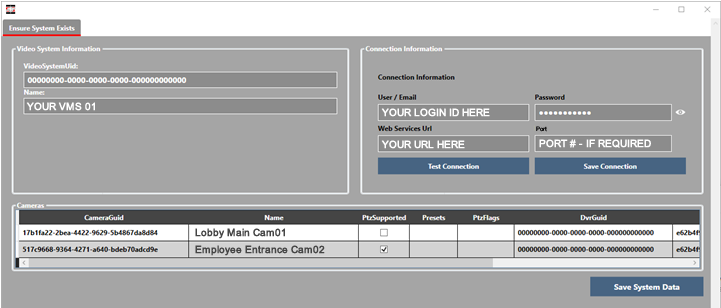
The fields available may vary for your brand of Video Plugin.
Test the VMS & Cameras
This step verifies that the VMS Unit and cameras were added correctly and that you can play video from chosen cameras.
PREREQUISITE
-
You must have completed the previous section by saving your System Data and restarting System Galaxy.
STEPS
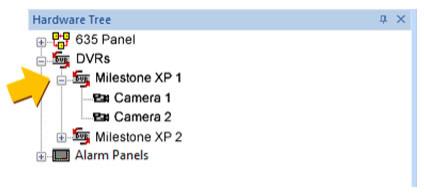
Launch System Galaxy and sign-in if you have not already done so. The Hardware Tree should be open.
TIP: You can refresh the Hardware Tree from the View menu.
-
Click the DVRs icon (+
 ) to see the list of VMS Units.
RESULT > you should see the VMS Name that you created in the previous step.
-
Click on your VMS Name (+
) to see the list of cameras imported.NOTE: If you did not create custom camera names in the VMS Unit before you imported, then you will see the default camera names from the VMS – such as Camera 1, Camera 2, (…), a serial number, or whatever the default naming scheme of your VMS unit.

Do not change cameras in Galaxy after the import is done. Camera names in Galaxy must exactly match the camera names in the VMS Unit. You must create custom or specified camera names in the DVR/VMS Unit before you do the camera import step.
VMS Unit & Cameras listed in the SG Hardware Tree
-
Right-click a Camera icon
 and select ‘View Live Video’ from the menu.
RESULT > the Video Viewer plays live video from the chosen camera. (Test every camera)
-
When you have tested all your cameras, you can link the cameras to the SG hardware ( readers & inputs ).
|
|
See Part-3 Configure Cameras to link cameras to readers or inputs. |
|
|
See the Hardware Programming sections in SG User Guide for assigning cameras to readers and inputs as well as configuring them to respond to alarm conditions such as “Door Forced Open” or “Armed Alarm”. |
.