Installing the DSR Server
This section provides information about the DSR Server Installation and instructions to install the DSR Server Components
TOPICS FEATURED
Components Installed
The DSR Installation Program installs the following components ...
-
DSR Server software
-
Assa Abloy service
-
DSR PostgreSQL database
-
DSR Support Tool
Important Notices
|
|
IMPORTANT - DSR Installation Info: The DSR Server must be installed on a separate computer from System Galaxy software or GCS Services. And you must use the DSR Install Program that is on the Galaxy Install Media. Do not download it from the Assa website at this time. |
|
|
IMPORTANT - Unsupported Options: WS Security (encryption) is not supported on the DSR Solution. You should also disable the Auto-confirm option (recommended by ASSA). |
|
|
NOTICE - Wake Card: You must send a "wake command" to each WiFi Lock to make them to connect to the DSR Server. To send a wake command ... (a) present a wake card*, or (b) press the inside COMM button on reader head, or (c) enter #323232 at reader keypad. |
|
|
MAKE A WAKE CARD IN SG-DSR Manager App: You can make a "Wake Card" in the SG-DSR Manager App by assigning the Wake Card option when you enroll an access card. You may need to confirm at least one reader. |
Install the DSR Server
STEPS
-
The DSR Server Installation file is found in the ASSA DSR folder under the Auxiliary branch of the Galaxy Install Media.
-
The SG Install Media on USB (Thumbdrive) can be ordered from Galaxy Customer Service.
-
The SG Install Media on ISO #2 file can be download from the Galaxy website.
-
-
(Licensure) Launch the DSR Installer and accept the license agreement and click NEXT.
-
(Install Location) Accept default folder location for the installation and click NEXT.
-
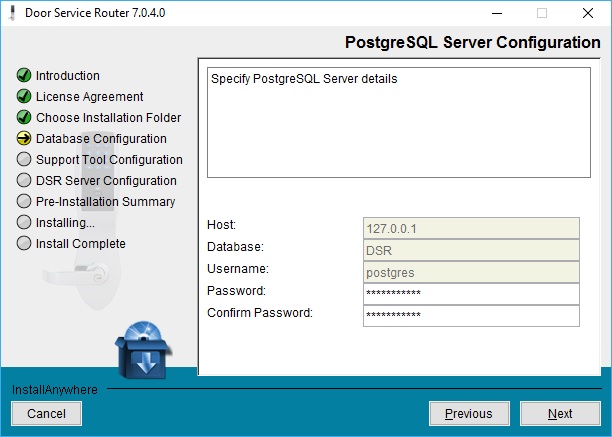
Specify a DSR Database login and password for the PostgreSQL Database and click NEXT.
Click to view image.

PostgreSQL Database Configuration | DSR Installer
-
Specify the DSR Support Tool login and password and click NEXT.
-
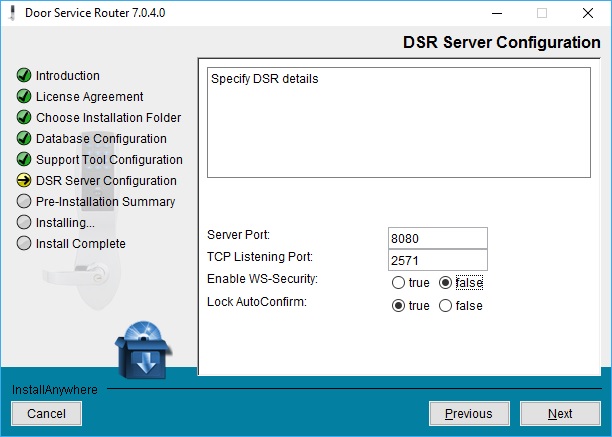
In the DSR Server Configuration screen you can do the following ...
-
Specify the DSR Server details in the text box - as appropriate.
-
You can set the port numbers.
-
Server Port (8080 = default communications with System Galaxy Server).
-
TCP Port (2571 = default communications with ASSA Locks).
-
-
Set the WS Security option to "False".
-
Setting "False" will turn off encryption.
TIP: It may be recommended to set "false" until you get all readers connected. You can turn on encryption in the DSR Support Tool after you have all readers working properly.
Click to view image.

DSR Server Configuration | DSR Installer
-
-
Set the Lock Auto-Confirm to "False" (recommended).
NOTICE: If you set auto-confirm to False, you must manually confirm locks in the SG Manager APP which will add them to both the DSR database and SysGal database.
NOTICE: if you are using DSR Installer version v 7.0.18.0 (or higher) you may not be able to select the AutoConfirm option. (DSR Installer v7.0.8.0 or below used to allow you to change this option.
Click to view image.

DSR Server Configuration | DSR Installer
-
-
Click Next to continue and accept defaults to allow installation to finish.
-
Restart the computer after you have completed the installation.
-
You must manually open Firewall Ports (8080/2571 <-- or whatever ports you specified during the install).
-
You also must create the necessary exceptions in your Antivirus software.
-
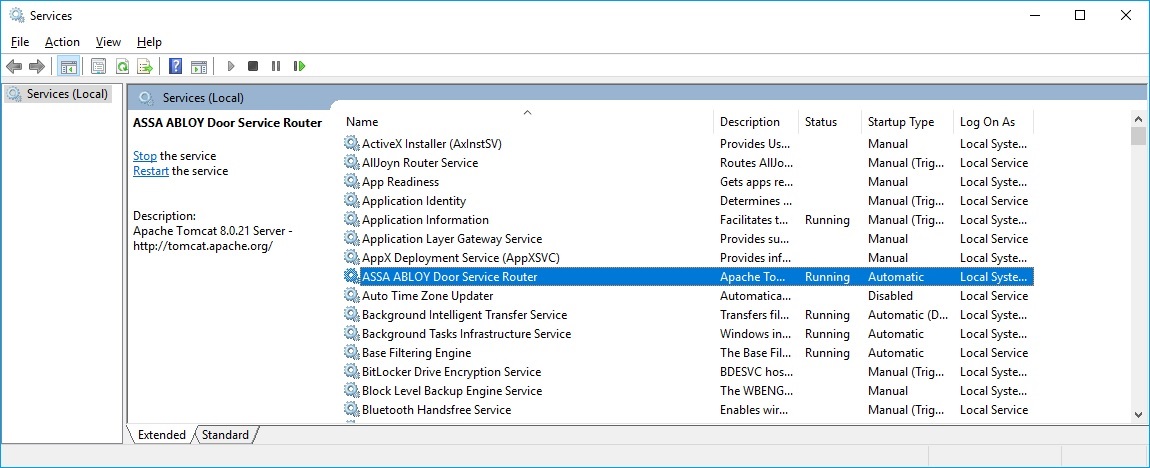
Verify the Assa Abloy DSR Service is running and is set to start "automatically".
Click to view image.

Assa Abloy Service | Windows Control Panel - Services
Next Steps ...
The next step is to verify the Assa Locks are connected to the DSR Server.
> CONFIRM LOCKS CONNECT TO DSR SERVER
The links below provide instructions related to the DSR Server.