CONFIGURING SYSTEM GALAXY SOFTWARE
CONFIGURING THE CONTROLLER AND DSI IN THE SOFTWARE
The System Galaxy software must be programmed with the information about the Galaxy Controller, DSI Board and Readers.
The following subsections describe configuring the System Galaxy software for Aperio Wireless readers. The main SG software manual describes the programming of cards, access rules, schedules, etc.
ABOUT SYSTEM GALAXY COMMUNICATION SERVICES
The System Galaxy software and core GCS Services must be running in order to load programming to the controller or send door commands:
System Galaxy Software used to …
-
program the Loop/cluster and panel settings, add DSI board, configure the DSI channel for the HUB-485, etc.
-
load card data, access rules, schedules/holidays, reader properties, etc.
-
monitor doors / events, send door commands, etc.
-
GCS Event Service. The controllers initiate connections to this service.
-
GCS Client Gateway Service
-
GCS Communication Service
-
GCS DBWriter Service
-
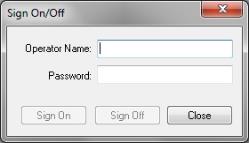
SIGNING-IN - SYSTEM GALAXY SOFTWARE
-
Double-click the SG icon on the desktop of the Communication server
-
Enter the login name and password for a Master level operator
Sign On/Off: Logging into System Galaxy
REGISTERING SYSTEM GALAXY FOR WIRELESS READERS
All product levels support the registration/licensing of wireless locks for branded readers.
To open the System Registration screen, you must be signed in as a master operator.
-
Open the Registration Screen: select Configure > Options > Registration > System
-
Select the correct Product Level
-
Enter appropriate information and option settings
-
NEW INSTALL/SYSTEM REGISTRATION: you must select the correct product level according to the purchased license agreement. You must configure all options according to the agreement. The Max Readers count the Max DSI-Based Readers count must match the purchase agreement.
-
UPGRADING REGISTRATION /ADDING WIFI READERS: you must update …
-
-
the Max Readers count (this is the total number of readers in the system including the total number of wireless readers)
-
the Max DSI-Bsed Readers count (this is the total number of wireless readers)
-
Enter the correct Registration Code.
-
Click [Apply] to save changes.
Registration Screen
_515x364.png)
ADDING THE LOOP/CLUSTER IN SYSTEM GALAXY
Add the Loop/cluster before adding the access control panel:
-
Click on the Loop button on the toolbar;
{Or from the menu, select Configure > Hardware > Loops/Clusters.}
-
When the Loop Properties screen opens, click [Add New].
-
Type in a loop name.
-
Set Loop Type to “600” (select 600 even if you have a 635 model CPU).
-
Set Connection Type to “TCP/IP”.
-
Enter the IP address of the Event Server (the PC running the GCS Event Service)
-
Remote Port should be “4003”
-
Enter the computer name of the Communication Server (the PC running the GCS Communication Service). You can click the [This Computer] button if you are programming this on the communication server.
-
Click [ Apply ] to save settings.
Loop/Cluster Properties: Configuring the Loop

ADDING A CONTROLLER & DSI BOARD IN SYSTEM GALAXY
Add the 635 Controller (access control panel) to the loop/cluster:
-
Open the Controller Properties screen: click on the Controller button on the toolbar,
{…or from the SG menu, select Configure > Hardware > Controllers (600) }
-
When the Controller Properties screen opens, select the Loop/Cluster name you just created in the previous step.
-
Click [ Add New ] to add the controller.
-
Enter the Controller serial number (found on the CPU board). This can be a valid serial number of any CPU in this loop/cluster.
-
Enter a user-friendly descriptive Name for the control panel. The software automatically assigns a controller name (shown below), However, you can change the name to one that describes the location or purpose of the panel (i.e. Lobby controller, or East Wing, 1st floor, etc.).
-
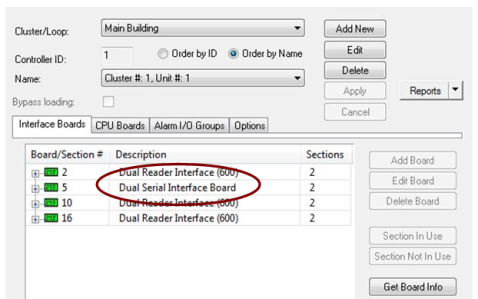
Click the [Get Board Info] button: the Board Info screen will open and display the list of boards in that panel (you must be in Edit mode to add the board info).
-
Click the [Save] button to add the boards.
-
Configure the other panel options as needed. You would only use Alarm I/O Groups here if you were monitoring the controllers alarm events.
-
Click [ Apply ] to save the panel configuration.
-
Controller Properties: Configuring the 635-series Controller
CONFIGURING THE SERIAL CHANNELS IN SYSTEM GALAXY
You must have added the DSI board in the controller property screen in order to be able to configure the serial channels. All the readers on a channel must be the same format (e.g. all Wiegand or all ABA). You cannot mix reader technology. This means you cannot have both ABA and Wiegand on the same DSI port/channel.
-
Open the Serial Channel Property screen : Configure > Hardware > Serial Channel from the SG menu bar,
-
Select the Cluster/Loop Name and the 635 Controller Name
-
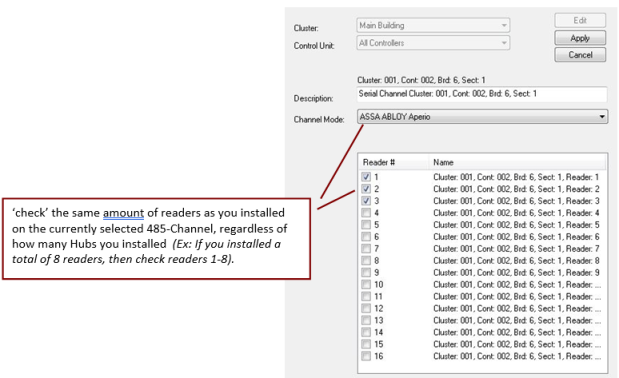
Select the appropriate DSI Board & section number (e.g. Board 1; Sect 1) from droplist.
-
Click Edit button and set the Channel Mode to ASSA ABLOY (must be using a 635 CPU to see ASSA)
NOTE: setting a channel to ‘Unused’ will disable the channel.
-
“Check” the appropriate reader numbers that you added to the currently selected 485-network regardless of how many hubs are on the network. You should not need to skip any reader numbers.
-
Click Apply to save changes.
NOTE: refresh/restart the Hardware Tree to see your readers. Do this by selecting View > Hardware Tree > from the menu.
Serial Channel Properties: Configuring the DSI Serial Channels
-
|
N |
APPENDIX: See APPENDIX section for the Hardware Address Table to help with enabling the correct readers. |