Moving SG Databases to a New Location
This page describes how to move the SysGal & SysGalArc databases to a new SQL Server, including creating database back-ups, restoring client logins and data sources. Updating maintenance date is included for those doing system upgrades. Also included are instructions to move or upgrade the main Communication/Event Server.

TOPICS FEATURED
Update SG Maintenance Date (Product Registration)
GENERAL REQUIREMENTS
This topic covers the requirements for various scenarios when moving a database. Also included are the requirements for moving and/or upgrading the main Communication/Event Server (System Galaxy software and GCS Services).
-
GENERAL REQUIREMENTS:
-
You will obtain the correct version* of the System Galaxy install media (USB/ISO), to install the MSSQL Server Express and Database Management Studio onto the new server.
Optionally, you can install an Enterprise version of MSSQL Server and DBMS software onto the new server.
* This can be the same or a newer version of SQL Server. -
You will install the correct version* of System Galaxy software from the System Galaxy install media (USB/ISO), ONLY IF you are either ...
(a) upgrading the existing System Galaxy software on the original server.
(b) or movingSystem Galaxy software & GCS Services to the new server.
* This can be the same or newer version of System Galaxy as needed. -
If the backups are automated, you need to find out where the backup files are located.
If the admins use the Galaxy GCS Service Manager utility to create the automated backups, then you can find the backup path in the SQL Backup Configuration screen of the GCS Service Manager utility. -
BACKING UP OTHER ASSETS: Before you perform an upgrade of the SG Software, you should back up all system assets before you upgrade or move. System assets (including system logs, reports, badge templates, biometric data, photographs, images, icons, logos, etc.). You should do this if you are moving, or upgrading, or both.
-
-
MOVING BUT NOT UPGRADING SYSTEM GALAXY:
-
If you are also moving the main Communication/Event Server, make sure that the version of System Galaxy installed on the new server is the same as the original server.
-
Remember to backup and move all your system assets.
-
-
MOVING AND UPGRADING SYSTEM GALAXY: Product registration must be valid (not expired).
-
Before moving the database to the target SQL Server, you must verify that the maintenance expiration date is valid (not expired). Open the System Galaxy Product Registration screen from the menu: Configure > Options > Registration > System.
-
After updating the maintenance date, you should perform back-ups of the databases before and after an upgrade. The first DB backup protects your data in case the upgrade fails. The second DB backup creates a backup of everything after the upgrade is done.
-
Remember to backup and move all your system assets.
-
UPDATING THE SYSTEM MAINTENANCE DATE (Product Registration)
You only need to update the Registration Maintenance Date if you are upgrading the System Galaxy (SG) software version. If you are staying at the same version of SG software, you can skip this step.
-
Log in to System Galaxy software with a dealer login.
-
Open the Product Registration screen from the menu: Configure > Options > Registration > System.
-
Enter the new Expiration Date and the Registration Code you obtained from an authorized support team.
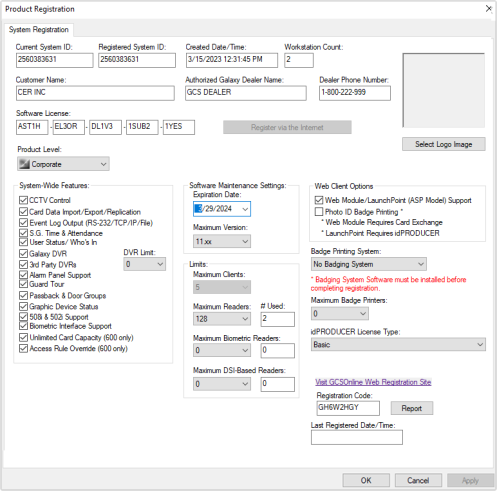
System Galaxy > Product Registration screen
CREATING DATABASE BACKUPS
This topic describes creating database backup files using the GCS Service Manager utility. .
-
Open the GCS Service Manger from the System Galaxy folder: c:\GCS\System Galaxy\Utilities
-
Right-click on GCSServiceManager.exe and choose “Run as Administrator” from the menu.
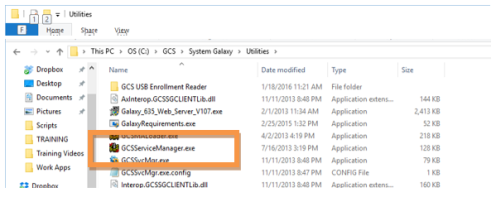
System Galaxy\Utilities > GCS Service Manager.exe
-
Click YES on the Windows ‘User Account Control’ message box.
-
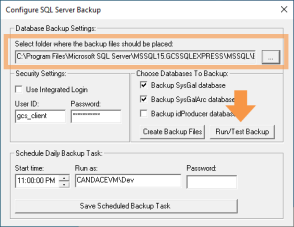
Select (highlight) “MSSQL$GCSSQLEXPRESS“ and click the [Configure SQL Backup] button.
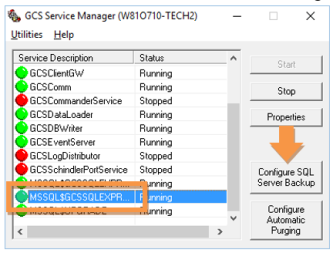
GCS Service Manager > showing MSSQL Service selected
-
Notice the designated backup path and click the [Run/Test Backup] button.
GCS Service Manager > Configure SQL Backup screen
-
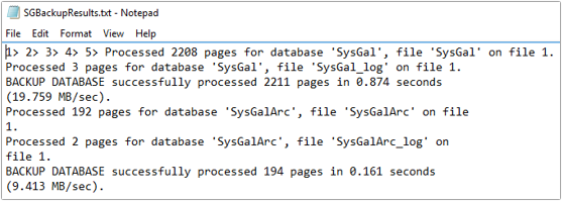
A confirmation file named “SGBackupResults.txt” should automatically open in Notepad.
RunTest Backup > SG Backup Results
-
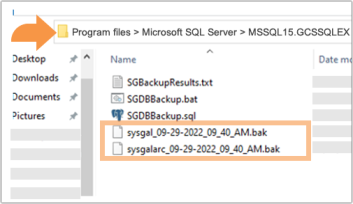
Browse to the backup folder path that was designated in the Backup Configuration screen. The SysGal and SysGalArc (.bak) files will be located in there with the SGBackupResults.txt.
RunTest Backup > Timestamped Database Backup files
Moving Database Backup Files to the Target Server
This topic describes the requirements and steps to copy your database files to the target SQL Server.
PREREQUISITES
-
You must install the appropriate system components on the target SQL Server before you can copy the backup database files – shown in step 1 below.
-
These instructions use industry-standard terminology to describe copying or moving files. The old server is called the original server or source server. The new server location is the target server.
-
On the new target server, install the necessary System Galaxy components from the Galaxy Installation Disk (USB/ISO) – by clicking Setup to launch the Installer Program:
-
(required) Install Part-1 - Prerequisites
-
(required) Install Part-2 - SQL Server Components (choose New Install)
-
(optional) Install Part-3 - SG Client Software (choose Option-A Client & GCS Services) only if the target server will also be running the main Communication/Event server.
-
-
Copy the database backup files (.bak files) onto the target server.
Best Practice: Copy files into the MSSQL Backup folder on the target server - or onto a portable drive that you use to transfer the files (i.e., not the server desktop). Always retain a safe copy -
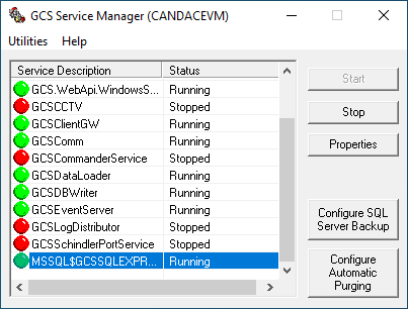
Stop the appropriate Galaxy services as follows …
-
Before stopping GCS Services, make a note of which services are running (green icon) so the correct services can be restarted.
-
On the Communication server, stop all of System Galaxy services that begin with “GCS”. Do not stop any service that starts with MSSQL$ - see image below.
-
Also shut down all System Galaxy clients (close the SG Software).

GCS Service Manager > showing GCS Core Services Stopped
-
-
(conditional) If you are moving the main Communication Server to the new target server, then you must disable the GCS Services on the original server. You do not need to do this if the main Communication Server is not moving.
-
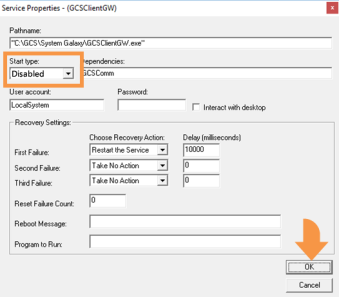
To disable a GCS Service using the GCS Service Manager Utility, select (highlight) the service name and click the Properties button.
-
In the Properties screen, change the Start Up Type to “Disabled” and click OK to save/close the Properties screen.
GCS Service Manager > Properties screen: disabling service
-
RESTORING DATABASE BACKUPS (Moving to new Server)
These instructions describe how to restore the database backup files to a new SQL Server location.
REQUIREMENTS
-
You must have already backed up your database files and copied/moved them to the new target server before you can begin these steps.
-
From the Windows start menu, open the SQL Server Management Studio.
-
In the SQL Server connection window, connect as follows …
-
Choose the correct machine\SQL instance name
-
Choose ‘SQL Server Authentication’
-
Enter valid login credentials: “sa” and the password
-
Click the Connect button.
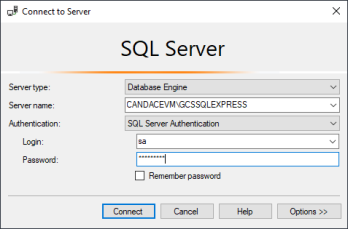
MSSQL Server SA Login
-
-
In the Object tree, expand the “Databases” branch.
-
Right-click the database you want to restore and select Tasks > Restore > Database.
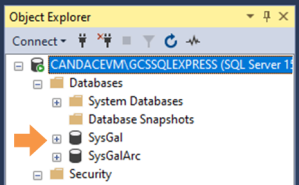
MSSQL Server Object Tree
-
Click the Device radio button in the Source section of the General page.
-
Click the Browse [ … ] button to browse to the SysGal.bak file location.
(When you repeat these steps for the SysGalArc database, you will see the SysGalArc name.)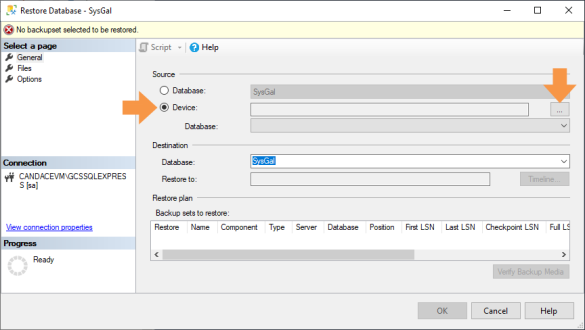
SQL Studio > Restore Database: General page
-
Click Add to open the Backup folder.
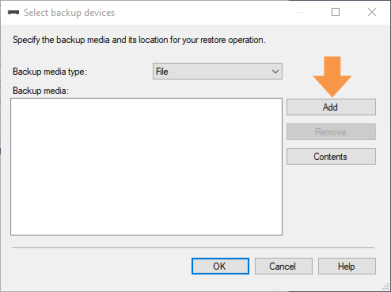
Restore Database General > Add Devices
-
Select (highlight) the SysGal.bak filename and click OK to return to the General page.
(When you repeat these steps for the SysGalArc database, you will see the SysGalArc name.)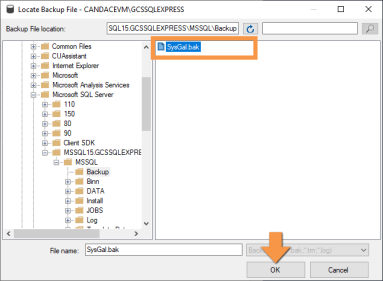
Restore Database General > Select Backup file
-
Click OK to open the Backup folder.
NOTE: the backup path (shown below) is the MSSQL15 backup path on the local server for SQL Server v2019. Your backup path could vary, but should display correctly in this screen.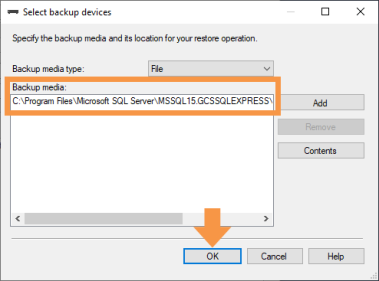
Restore Database General > Add Backup Path
-
In the General page, the Source and Destination fields will be populated with the designated backup path and the SysGal database file name.
(When you repeat these steps for the SysGalArc database, you will see the SysGalArc name.) -
The Restore column checkbox should be “checked”.
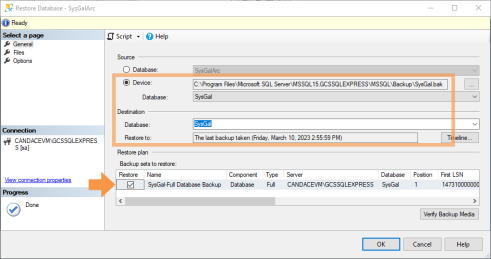
Restore Database > General page: Full Database Backup
-
In the lefthand pane, click the Options page and enable the Overwrite checkbox and click OK.
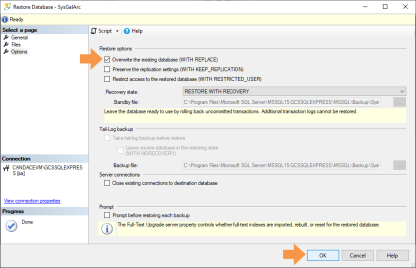
SQL Studio > Restore Database: Options page
-
Repeat all the steps in this section for the SysGalArc database
RESTORING GCS CLIENT LOGINS
This section describes recreating the gcs_client & gcs_web_client logins for both databases (sysgal/sysgalarc).
The instructions cover the following actions …
-
Deleting the client logins under the Security>Users branch of both databases.
-
Restoring the client logins in the Security>Logins branch under the SQL Instance.
Remapping the client logins in the Properties screen under the Logins branch will automatically recreate all the client logins under the User branches for both databases, all at once. -
Restart the GCS Services.
DELETING GCS CLIENT LOGINS
On the new target server, open SQL Management Studio and login/connect to your GCSSQL Instance using the SA password.
-
Expand Databases > SysGal > Security > Users branch - delete the existing gcs logins …
-
Right-click on gcs_client login and choose Delete.
-
Right-click on gcs_web_client login and choose Delete.
-
-
Expand Databases > SysGalArc > Security > Users branch - delete the existing gcs logins …
-
Right-click on gcs_client login and choose Delete.
-
Right-click on gcs_web_client login and choose Delete.
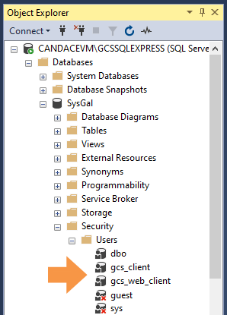
Object Tree > Database Users branch
-
RESTORING GCS CLIENT LOGINS
You can restore the gcs client logins for both databases, by remapping the client logins from the Properties screen under the Logins branch.
-
Expand the Security > Logins branch that is under the GCSSQL Instance (i.e., not the security branch under the database).
-
Under the Logins branch, right-click on the gcs_client login and select Properties from the menu.
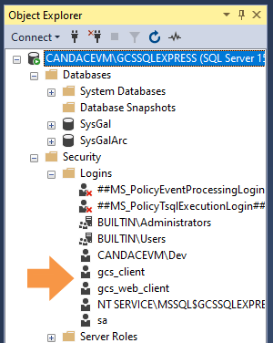
MSSQL Object Tree > Instance Logins branch
-
In the Properties screen, select the Mapping page (lefthand menu)
-
Configure the User Mapping for the gcs_client login as follows …
-
place a checkmark by the database names (both SysGal & SysGalArc)
-
type “dbo” into the Schema field for both databases
-
assign the membership roles for þ db_backupoperator, þ db_reader, and þ db_writer, as shown in the image below. Do this for both SysGal & SysGalArc databases.
-
Click OK to save the gcs_client mapping for both databases
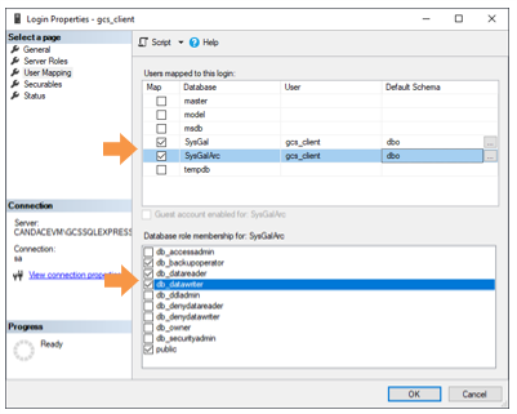
MSSQL Instance Login Properties for client & web client
-
-
Return to the Logins branch, and right-click the gcs_web_client and open the Properties screen.
-
Select the Mapping page and complete the mapping for gcs_web_client login as follows …
-
place a checkmark by the database names (both SysGal & SysGalArc)
-
type “dbo” in the schema field for both databases
-
assign the membership roles for þ db_backupoperator, þ db_reader, and þ db_writer.
Do this for gcs_web_client in both SysGal & SysGalArc databases.
-
-
Click OK to save the gcs_web_client mapping for both databases.
-
Return to the database level and expand Security > Users branch for both databases (SysGal / SysGalArc).
-
You should see the gcs_client and gcs_web_client logins have been restored in both the SysGal and SysGalArc databases.
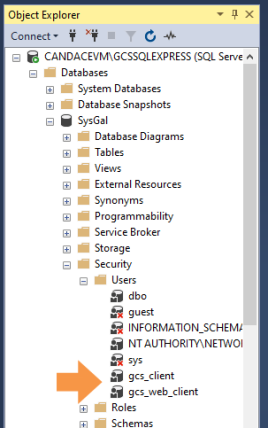
MSSQL Object Tree > Database Users branch
RESTARTING GCS SERVICES
You will start the GCS Services on the server wherever the main Communication/Event Server is operating.
If you moved the main Communication/Event Server to a new location, you should make sure the GCS Services are disabled on the original server only.
-
Restart the GCS Services on the main Communication Server using the GCS Service Manager utility.
-
select the GCS.WebAPI Service click START button
-
select the GCS ClientGW Service and click START
-
select the GCS Comm Service and click START
-
select the GCS DataLoader Service and click START
-
select the GCS DBWriter Service and click START
-
select the GCS Event Service click START
-
also restart any GCS services that were running before you started the database migration.
GCS Service Manager > showing Core GCS Services running
This completes the section on restoring the logins and starting services.
-
UPDATE THE DATA SOURCES ON EACH CLIENT
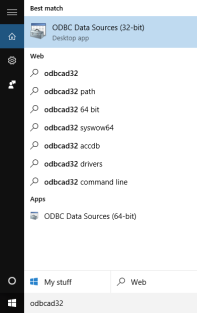
On 64 bit machines, access the 32 bit ODBC Administrator by entering “odbcad32” in the Windows Search field.
Open the “ODBC Data Sources (32 bit)” desktop application from the search results.
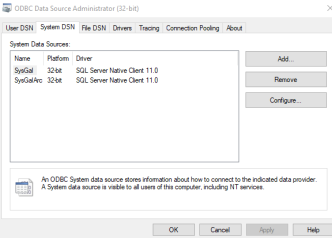
In the ODBC Data Source Administrator, select the System DSN tab and click Add.
In the DSN Configuration screen, select the appropriate target server (i.e., the machine name\GCSSQL Instance name ) … and click NEXT.

Select SQL Server authentication and enter the gcs_client login and password.
Also select/check the option to “Connect and obtain default settings …”, and click NEXT.

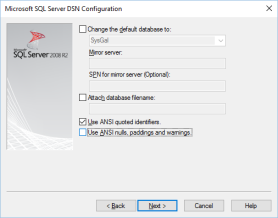
Select/check the option to “Use ANSI quoted identifiers”, and click NEXT.
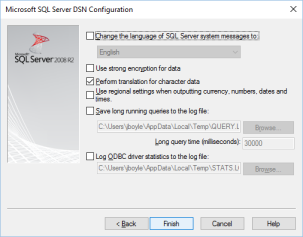
Select/check the option to “Perform translation for character data”, and click FINISH
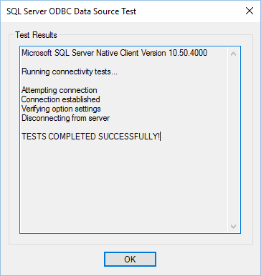
Click [ Test Data Source ] button.
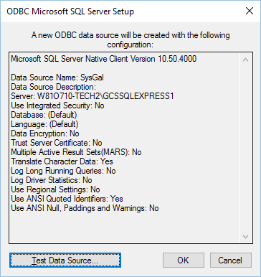
Click OK when you receive “TEST COMPLETED SUCCESSFULLY”.