VERIFYING YOUR SYSTEM DATA
This topic covers verifying all your system data looks correct.

VERIFYING IDPRODUCER VERSION AND BADGING DATA
ASSUMPTIONS
-
The idProducer Master service and Connector service are running, including IIS on the new server.
-
Launch the idProducer Print Dispatcher from the Windows search field on the taskbar.
-
When the Print Dispatcher opens for the first time, it will prompt you to create a new dispatcher name.
-
Log In to start the new Print Dispatcher running.
-
The Print Dispatcher icon should be visible in the Windows task tray.

Windows Taskbar: idProducer Print Dispatcher icon
VERIFY THE WEB CLIENT IS CORRECTLY LICENSED
-
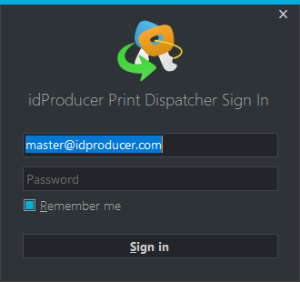
Launch the idProducer Web Client from the desktop icon.
-
Sign-in to your licensed client using the master login.
-
LOGIN NAME: “master@idproducer.com
-
PASSWORD: “master”
-
-
Verify your templates are all present by opening the Template Editor from the Web Client home page …
-
On the Client homepage, click on Template Editor icon.
-
When the Template Editor opens, you can select Customer Subscription name(s) and verify your templates are correctly displayed.
-
For a Basic license, all the templates will be on the Root Subscription (as pictured).
-
For an Advanced license, there will be multiple Subscriptions which correlate to a different Galaxy Customer. The templates should be present for each Subscription.
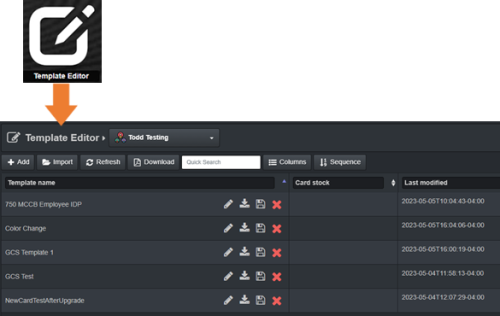
idProducer Template Editor page
-
VERIFY BADGES ARE VIEWABLE FROM SG CARDHOLDERS SCREEN
ASSUMPTIONS
-
If you want to test print a badge at the badge printer, the correct print drivers must be installed.
SG Menu: Configure > Cards > Cardholders
-
Open the Cardholder screen and verify that your badge designs are available for the existing cardholders and new cardholders.
-
For Basic License, you should see all templates in the Cardholder Badge list for every cardholder, regardless of whether you have customers or not.
-
For Advance License, you should only see the templates in the Cardholder Badge list that correspond to the templates in the related subscription.
-
-
You may want to verify you can view or print a badge from System Galaxy.
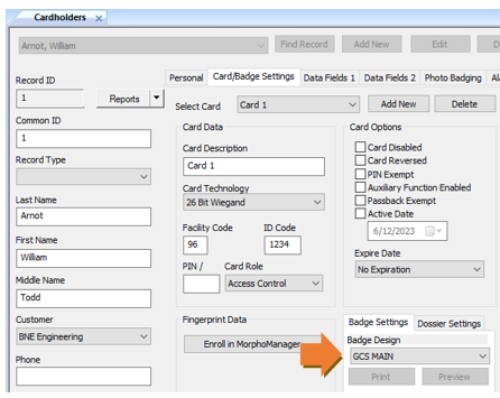
System Galaxy: Cardholder screen
CONFIGURE THE CLUSTER PROPERTIES TO POINT TO THE NEW SERVER
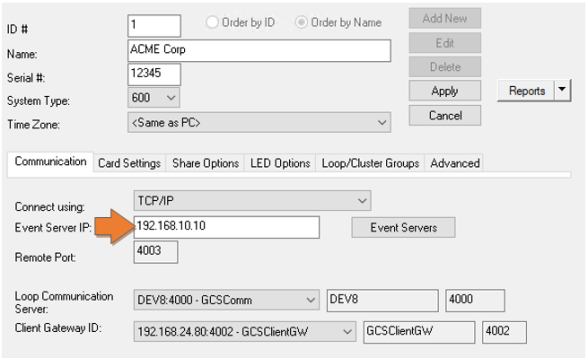
You must configure the machine name or IP Address of the new server into the Event Server IP field of the Cluster Properties screen. This must be done for every Loop/Cluster in the system.
Be aware that the 635/600 Controllers will not connect and start logging events until you change the Event Server IP Address in the panels.
SG Menu: Configure > Hardware > Cluster/Loop Programming
-
Open the Cluster Programming screen from the Hardware Tree as follows …
-
Right-click the Cluster Name in the Hardware Tree to see the shortcut menu.
-
Choose Properties from the menu.
-
-
Configure the [Event Server IP] field to use the Machine Name OR IP Address of the new server.
-
Click Apply to save the changes.
-
Repeat these steps for every Cluster in the system.
IMPORTANT: After you save the Cluster Properties screen, you must also change the Event Server IP Address in every controller panel to match the IP Address of the new server from the Panel Webpage. Then the controllers can connect to the new server, and begin logging events.
-
PROGRAM THE NEW EVENT SERVER IP ADDRESS INTO THE CONTROLLERS
Now you must configure the new server’s IP Address into each 635/600 Controller by using the panel’s embedded webpage so that the controller panels can connect and begin logging events.
REQUIREMENTS
-
You must open the panel door open to be able to connect by web browser.
-
Open a web browser on a computer that is connected to the network.
-
Enter the panel’s IP Address into the URL field of the browser.
-
click Panel Configuration link at the bottom of the Panel Status Webpage.
-
Scroll down to the Event Server addresses table.
-
Add the IP Address of the new server into the Event Server-1 field.
-
Save your changes.
-
Allow the controller to connect to the Event Server.
RESULT: When the panel is connected, a “Controller Online” event should be logged in the Event Monitoring screen in System Galaxy. You can also verify panel connection status by sending a ‘Get Controller Info’ command from the Loop/Cluster Diagnostics screen or the GCS Loader Screen on the Flash tab. -
Proceed to the next section for Loading the hardware panels.
LOADING FLASH TO A CONTROLLER (FOR UPGRADES ONLY)
If you upgraded System Galaxy’s software version, then you must upgrade 635/600 controllers with new Flash.
NOTE: If you only migrated the databases to the same version of System Galaxy, then proceed to the section for Pointing Clients to the New Server.
-
In system Galaxy’s Help screen, determine which version of flash the 635/600 Controllers will need.
-
You can load the new Flash using the panel’s embedded webpage as follows …
-
Copy the current S28 Flash files to the computer you are using to connect to the panel.
-
You must upgrade flash in the CPU and then Update Daughter board flash.
-
Follow instructions in the 635/600 Flash Update Guide to properly load flash.
-
-
After the new flash is loaded into the CPU, and all Daughter Boards have finished updating, you can verify that your panel has the new flash version from the Loop/Cluster Diagnostics.
-
Repeat these steps at every controller.
-
Proceed to the Loading Data section
LOADING DATA TO A CONTROLLER (FOR UPGRADES ONLY)
After you upgrade the flash in the controllers, you must load data to the controllers.
NOTE: If you only migrated the databases to the same version of System Galaxy, then proceed to the section for Pointing Clients to the New Server.
-
Login to System Galaxy software with a master operator login.
-
In Galaxy’s Hardware Tree, right-click on a 635/600 Cluster and choose Load from the shortcut menu.
-
When the GCS Loader screen opens, choose the Load Data tab.
-
Click the Load Data button and allow all data to load.
-
Repeat this for every cluster until all panels are loaded.
-
Walk test your system hardware as appropriate.