Elevator Floor Group Mapping
This topic covers the system administrator's ability to map users to elevator floor groups for the Elevator system used by LaunchPoint.
FEATURED TOPICS
Elevator Floor Group Mapping (admin only)
This screen allows a system administrator to map users to floors in the Elevator system.
REQUIRED HARDWARE SETUP
Before the Elevator Floor Mapping can be done in LaunchPoint, the following hardware programming must be completed in System Galaxy (SG).
-
At least one reader must be configured to be an “elevator reader” in the SG Configure > Hardware > Reader Properties screen.
-
For elevator relays to be visible in LaunchPoint, the output relays must be configured to "show in tree" in Output Properties screen.
STEPS
-
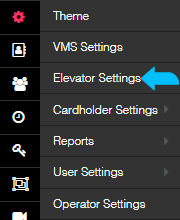
Click on the Settings icon on the side menu and choose Elevator Settings.

-
The User Elevator Mapping window will open.
NOTICE: The search fields in this page use inclusive search rules to help filter or narrow down the information shown in the list.
TERM: An “inclusive search” means that the search results will contain records that include the search criteria you provide.
For example: If the letter "d" is the search criteria, the search will only return records (i.e. user names) that include the letter “d” even if the name does not start with “d”. Thus, the results would contain names like Andrews, Davis, Edwards, ... because each name includes the letter “d”. -
Select (click) a user name in the first column to begin creating the Floor Group.
[ HINT: clicking the user name a second time will deselect it. ]
-
Next, select (click) the individual Floor Relays(readers) from the second column to choose them for the group.
[ HINT: you can click more than one group to give the user access to multiple floors(shown above). ]
[ HINT: to deselect a camera, click the camera a second time. ]
-
Click the Map button to assign the group of floors to the user.
-
Click Close on the User Confirmation message.
Result: This message confirms your Floor Group is created.
-
The new User-Floor Group is created and added to the Floor Groups list (3rd column).
[ HINT: you can see the total number of Floors/Relays in the parentheses. ]
-
You can close the page if you are finished.
-
To Add more floor/relays to an existing Floor Group, do the following ...
-
Select the same user name in the first column.
-
Select the additional floor relays in the second column -
(no need to reselect floors/relays that already belong to the group, just pick the new ones you want to add). -
Click MAP button to add the floor/relays to the existing Floor Group in the third column.
-
You should see your chosen floors are added to the Floor droplist - and the total count in parentheses will increase.
-
-
To Remove one or more floors from a Floor Group, do the following ...
-
Open the Floor droplist in the 3rd column for the user you want to update,
-
Uncheck only the floors you want to remove.
-
Click the UPDATE button to remove the floors.
-
You should see the deselected floors are no longer in the Floor droplist - and the total count in parentheses has decreased.
-
-
To Delete a Floor Group entirely, do the following ...
-
Open the Floor droplist in the 3rd column for the user floor group you want to update
-
"Uncheck" the select all option to remove all checkmarks from every floor/relay in the list.
(Note: if any floor remains checked, the group will not be deleted.) -
Click the UPDATE button to delete the Floor Group completely.
-
You should see the Floor Group has been deleted from the 3rd column.
-