Custom Report Scheduler
The Report Scheduler lets the user create custom reports for a variety of reasons. Custom reports can be saved and reused ‘on-demand’ or run at scheduled times.
FEATURED TOPICS
Rules and Requirements
The Reports Scheduler includes a wide variety of reports covering hardware activity, system event activity, card activity, cardholder population, and more.
-
The user’s login account must have the correct permissions to view and configure the report.
-
To avoid excluding data, the user must set the correct report time-span (a.k.a. the “past # hours”) which is counted from the report’s scheduled run-time.
For Example: If you want the report to run at 6pm to collect all the events from 8am, then you must chose to capture the past 10 hours. You can test your report with the run ASAP feature verify you are getting all the data from the time-frame.
-
The red asterisk (*) indicates a field that user must fill-out to send the report.
-
You must include at least 1 email recipient (red asterisk)
-
You must include a subject line.
-
You can optionally include up to 4 email recipients and one BCC (blind or back copy), as well as text in the email body that describes why you are sending the report or what it is about.
-
-
Whatever you put in the Comments field will be used as the Report Name in the ‘Select Report’ droplist. Be sure to use a naming convention that is brief and will sort and identify the report the way you want.
-
The system will generate the scheduled report even if there is no data matching your selected criteria. If you know it is incorrect to have an empty report, then verify that you have selected the correct criteria and report duration (past # hours).
-
You must have a compatible software application to view the reports. The report will be attached to email in 2 formats - CSV and PDF.
-
CSV file opens in MS Excel or other compatible application.
-
PDF file opens in the free Acrobat Reader or other compatible reader.
-
How to Create a New Scheduled Report
This section describes the steps to build a scheduled report and includes information about how report features work.
QUICK STEPS: Build a Scheduled Report in 7 Easy Steps ...
-
Select the Report Type from the cascading menu.
-
Choose “NEW” report.
-
Select the Report Criteria (filters/grouping - such as loop, department, etc. ).
-
Add Email Criteria (i.e., recipients*, a subject*, body text, and comment, ...)
-
Choose the Report Duration or time-span to query (i.e., past # of hours).
-
Configure the Report Schedule (i.e., runtime - as in daily, monthly vs. on-demand).
-
Save the Report (saves the schedule & runs the report).
STEP 1 • HOW TO OPEN A SCHEDULED REPORT
You can open the list of Scheduled Reports from the Report icon on the left side menu.
-
Click the Report icon on the side menu.
 × Reports Icon
(
only on the side menu
)
-
When the menu opens, choose the Schedule Report option
(beneath the Who's In Report).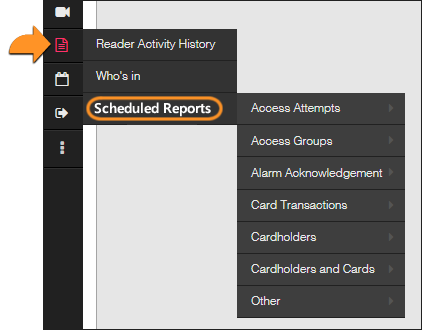
-
When the cascading menu expands, choose the report you want.
See the List of Available Reports at the end of this topic.
STEP 2 • CHOOSE “NEW” REPORT
This step focuses on creating a “new” report.
About Existing Reports: You can also choose an existing report that has been saved. Be aware that you are not making a new copy of an existing report, but you are just changing the existing report. The report screens and data fields will work the same whether you are creating a new report or editing a report that has already been built.
-
Choose “NEW” in the Select Report droplist at the top of the screen.
You can also select an existing report from the saved reports that were previously built.
-
When you choose ‘NEW’, you begin building a new report. The report fields will be set to default options.

STEP 3 • SELECT REPORT FILTER/GROUP CRITERIA
This step selects the Report Criteria that will filter the queried report data.
About Report Criteria: Each report type has different criteria, such as Loop(s), Customer, Department, etc. The available criteria fields are dynamic and change according to which report you have selected. For example, if the report looks at reader activity, you will need to select which loop to filter by. If the report queries cardholder activity, you will need to select which customer or other applicable filter.
-
Select the appropriate Report Filter Select Report droplist at the top of the screen.
-
This field is dynamic and changes to loop or other appropriate filter, based on which report you are building.

-
STEP 4 • ADD EMAIL CRITERIA FOR THE REPORT
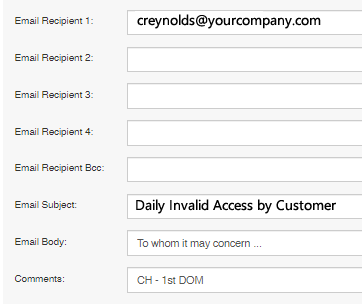
You must choose at least one email recipient and enter a subject line that identifies the report - such as ‘Daily Invalid Access Attempts’.
-
Enter the email address of the first recipient (required).
Add up to 4 email recipients as needed.
-
Enter the Subject text for the email (required). The subject text should be always true and identify the report to the email recipient(s). You would not want specific information that is only true once if the report is going to run on a repeated cycle.
You may want to include the following in the subject line ...
-
Report Name (such as Invalid Access, Who’s In, Cardholder Activity, ... )
-
Report Cycle (monthly, weekly, daily, or day - such as Monday, Friday ... )
-
Report Filter/Group (customer, department, loop(s), or other filters ... )
-
Report Duration (the time-span covered - morning ,
For example, if the Invalid Access Report is sent daily, then you may want to name the report “Daily Invalid Access for Department” in the subject line.
.
-
-
Enter email Body text as desired (optional). Use consistent description that explains the scope/criteria, and detailed definition of the report data. This text you enter here should be always true regardless of how many times the report cycle will run.
-
Whatever you enter in the Comments field will become the report name in the ‘Select Report’ droplist.
-
Add a BCC Recipient as desired (optional).
STEP 5 • CHOOSE THE REPORT DURATION (Past # Hours)
This field is dynamic and does not always display depending on which report you are pulling. The report duration sets how many past number of hours the report data is queried - counting from the runtime.
For example: If you need to see all reader activity since 8am, and you run the report at 6pm, then you will want the duration (past # hours) to be at least the past 10 hours. Make sure to test your report.
-
Enter a numeric value that is large enough to capture all the data you need to see.
...
STEP 6 • CHOOSE THE REPORT CYCLE (Scheduled vs On-Demand)
The report cycle is the scheduled time that you want the report to run or process - i.e., the run-time.
-
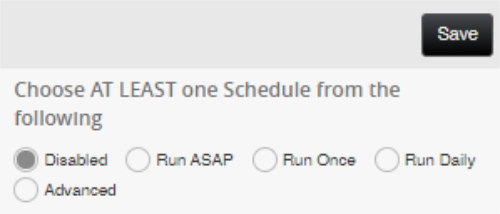
Choose “Run Daily” or “Run Advanced” if you want the report to run on a scheduled basis.
-
Running Daily is shown below ...
Select (check) one or more days and choose the run time (hh:mm).
-
Running Advanced (monthly or quarterly, etc. ...
Select (check) one or more days of the month or quarter; and choose the run time (hh:mm).
-
-
(optional) Choosing “Run ASAP” will run the report on-demand.
Skip this step if you scheduled the report.
-
Select the Run ASAP option.
-
Click Save to run the selected report.

-
-
(optional) Choosing “Disabled” will stop the report run cycle indefinitely.
Skip this step if you scheduled the report.
-
Select the Disabled option.
-
Click Save to disable the selected report.
-
STEP 7 • SAVE YOUR REPORT
Saving the report will add it to the Report Selection droplist at the top of the screen.
-
Click the Save button to save the report. Report will be added to the Report List at the top of the screen where you can select it again to edit whenever you need.
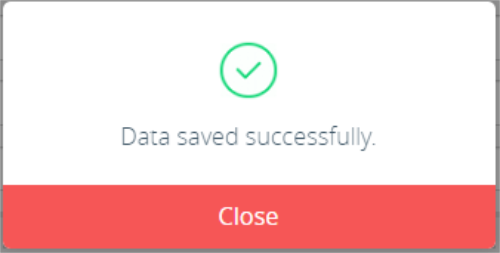
The system should display a user prompt to confirm your report has been successfully saved.
-
The scheduled report will be distributed as an email attachment to the chosen recipients.
The report is sent as an email attachment in two formats - i.e., CSV (Excel) and PDF.
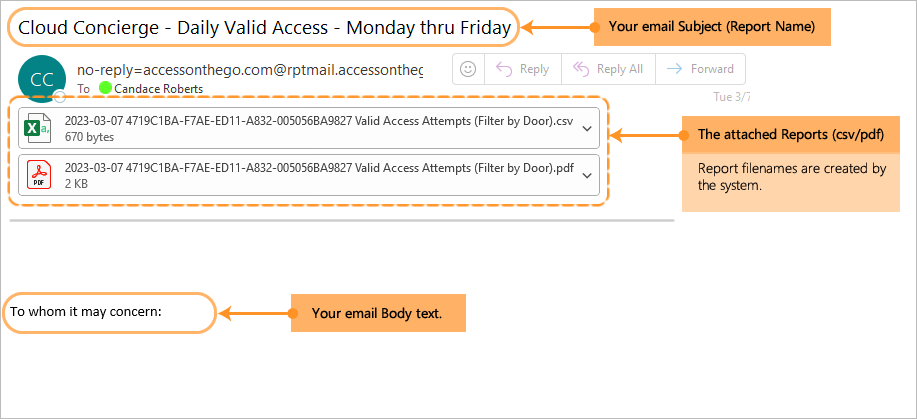
Above image is an example of email attachments when scheduled reports run.
Example of a CSV Report opened in MS Excel (above)
List of Available Scheduled Reports
Below is a list of the available Reports that you can create. The available filtering criteria will dynamically change to suit the Report you select - i.e., filter my loop, access group, department, etc.
NOTE: The system will produce the report even if there is no data matching your selected criteria. If you get an empty report, either there is no data matching your criteria, or you need to adjust your report duration or other criteria to get the data you expect.
-
Access Attempts
-
Valid Attempts
-
Invalid Attempts
-
-
Access Groups
-
Member by AG
-
Member by Loop
-
Summary
-
-
Alarm Acknowledgments
-
Doors n Readers
-
Guard Tour
-
Inputs
-
-
Card Transactions
-
By Cardholder
-
By Customer, order by cardholder (name)
-
By Door and Access Profile
-
By Door
-
By Input ID
-
By Loop
-
Related card transactions
-
-
Cardholders
-
By Access group
-
By Access Profile
-
By Customer
-
By Department
-
By Door
-
By Facility Code
-
Disabled Cardholders
-
-
Cardholders and Cards
-
By Customer
-
-
Other
-
Low Battery Wireless (readers)
-
Who’s In (personnel muster report)
-