Import & Flash New Controllers
This topic covers how to import a customer’s new Controllers into the System Galaxy software.
FEATURED TOPICS
Confirm & Update Flash Version
Supporting Documentation
Importing New Controllers into System Galaxy
This covers how to add/import each new controller to its Cluster in the SG software, which can be done after the controller hardware has been fully configured in the field.
-
Sign-in to your System Galaxy software on the cloud-consierge server using the VPN Client and Windows Remote Desktop. (The login credentials are found in your Onboarding Document).
-
Open the Loop/Cluster Diagnostics screen ( go to View > Loop/Cluster Diagnostics ).
-
Select the desired Cluster Name that you created earlier.
-
Select the “Get Controller Info” in the command droplist.
-
Click the Execute button and all the controllers that are configured and connected for the chosen Cluster will appear in the list. The listed controllers have not been imported at this point.

-
You must “check” the checkbox beside the controller(s) that you want to import.
IMPORTANT: if you are adding the first controller to the Default Cluster (cluster 1), then you do not need to import it because it has already been preprogrammed into Cluster 1. Therefore, you only need to import the boards for Unit 1 and Cluster 1 (Default Cluster). However if you are adding any additional controllers to the first cluster or any other cluster, then you will use this method to import the panel.
-
Click the Save New Controllers button to import the new panel.
-
Click OK to confirm your import.
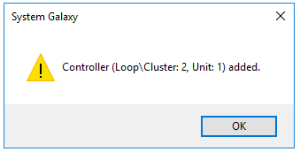
Import New Boards into a new Controller
This section describes how to import new daughter boards for a new Controller using the Get Board Info feature.
About using GET BOARD INFO to Import New Boards: The Get Board Info feature automates the task of importing the boards from a new controller. This feature displays the list of attached boards for a controller in the Board Info screen. From there you can import (save) all the listed boards at the same time.
-
Make sure the Controller Properties screen is in Edit mode, before you click [Get Board Info].
-
Make sure all the expected daughter boards are visible (listed) in the Board Info screen before you SAVE the list. If you save boards while any boards are not connected, you may need to individually add the missing/undetected boards later by using the Add Board feature.
CAUTION / BEST PRACTICE: Choose ‘NO’ when you are prompted to “delete programming for undetected boards”. This message refers to the programming for the peripheral hardware devices, such as readers, doors, inputs, outputs, schedules, etc. Choosing NO will protect existing programming for peripheral hardware as long as the new board type is the same as the pre-existing board. If a preexisting board number is associated with a different board type -- or if you choose ‘yes’ -- then the system programming is not preserved.
-
Refresh the Hardware Tree by closing it and reopening it from the SG Menu ( View > Hardware Tree ).
-
In the Hardware Tree, click (expand) the Cluster Branch that you want to add a new controller to.
-
Click (expand) the Controllers Branch in the selected Cluster.
All newly imported Controllers will be listed under the Controllers Branch, but you will not see Readers (or devices) until after you import the new boards. -
Right-click on the new Controller and choose ‘Properties’ to open the Controller Properties screen.
-
In the Controller Properties screen, click EDIT button to place your new controller into edit mode.
-
Click the [GET BOARD INFO] button to import the board information ...
-
The attached Boards will be detected and displayed in the Board Information window.
-
Click the SAVE button to import the board info into the Controller Properties screen.
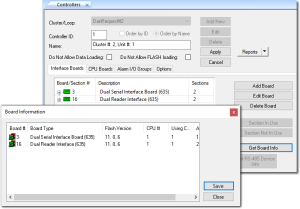 NOTE: You must be in edit mode to save the new board information.
 -
(Recommended) Click NO when you are prompted to ‘delete undetected boards from programming’.
IMPORTANT: This message is alerting/asking if you want to delete the existing programming that is associated with an undetected board - such as readers, doors/locks, inputs, outputs, sensors, etc., which includes the programmatic linking in the device properties to schedules, access rules, door groups, areas, cameras, etc.When you click NO, the following will happen for each case scenario ...
-
Case-1 (ideal) : You want new boards to seamlessly inherit system programming of old boards.
The new board(s) must have the same board ID and same board type as the old board(s), then the existing programming will be saved and inherited by the new boards. The new boards will use the programming that is already vetted and working.For Example: a new DRM#1 is replacing old DRM#1 = all existing reader/door programming will be saved/ inherited by new DRM - including device properties (timers/alarms) and programmatic linking to schedules, access rules, cameras, sensors, switches, elevator floors, etc. This scenario can come into play if you are replacing an existing boards for upgrades or repairs. This option saves the integrator from having to recreate all the system programming the customer originally had working. -
Case-2 (ideal) : You need to import new boards while an existing board is offline for service/repairs. In this case the offline board is truly “undetected” at the time of import, but you definitely want to save its existing programming for when the service is completed and the board is brought back online.
Another reason could be that you meant to match-up a new board to the existing ID, so you want to save existing programming now, so you can go back and adjust the board addressing without loosing the system programming. In either case, you want to save the existing programming for reuse. -
Case-3 (caution): Be aware that if a new board has the same Board_ID, but is a different Board_Type than an existing board, then the existing programming will be deleted because it is a mismatch. You need to consider whether this is the intended consequence. If you really do want to delete the existing programming, you can proceed with the NO. Remember you can also CANCEL out of the Import if you want to address this case.
Example: old Board#1 (DRM) and new Board#1 (DIO) = since the board type doesn’t match, the existing reader/door programming of the original board will be deleted/lost; The new board ID will replace the old board ID but it cannot inherit existing programming. So the existing programming must be deleted. -
Case-3: if your newly detected board has a new ID that was never used in the system before, the newly detected board will be added to the Controller Programming, but there is no existing programming to inherit. You will need to add your device programming as normal.
BEST PRACTICE: Plan ahead to make your new boards match the board types and board IDs of the previous hardware, so you can take full advantage of existing programming and inherit what is already vetted and working. It can be difficult to replicate the customer’s existing system programming for new boards.ATTENTION: if you choose YES (delete “undetected” boards) then the newly detected boards will be added to the controller, but all existing system programming for “undetected boards” and unmatched boards will be deleted; such as readers, doors, inputs, outputs, etc. Choosing this option should be well thought out. -
-
-
When prompted, select the Default Reader Type (e.g., Proximity) then click OK.
-
In the Controller Properties screen, click Apply to save your new boards permanently in the system.
See the System Galaxy Software Manual for in depth instructions to program the schedules and options for the hardware (i.e., Reader/Doors, Inputs, Outputs, etc.). -
Repeat steps above to import boards for other controllers as needed.
Verify & Update Controller Firmware
These instructions explain how to identify and update the controller firmware, known as S28 Flash.
Steps to Updating Controller Firmware ...
-
Identify the system-compatible flash version for your system.
-
Identify which flash version is running in your existing controllers (635, 600, & mixed).
-
How to load flash to the individual CPUs.
-
How to update flash to the daughter boards.
IMPORTANT: All controllers should be running a system-compatible version of S28 Flash firmware based on which type of cluster they are in. Failure to operate controllers using a compatible version of firmware can cause undesirable results.
STEP-1: Identify Your ‘System-Compatible Flash Version’ (by Cluster)
Each released version of System Galaxy(SG) has a designated system-compatible flash version for the 600 and 635-series Clusters.
About the About screen ...
-
The About screen is best place to identify which system-compatible flash version you should load in a controller CPU.
-
The About screen shows how the flash versions apply to each Cluster Type (i.e., 635-Cluster, 600-Cluster, Mixed Cluster).
-
Open the About screen from the System Galaxy menu: select Help>About
-
Identify which Flash Version should be used for the “635 Clusters” in your system.
A 635-Cluster has no 600 controllers in it. This version of flash should be available in your Loader screen, but the Loader will not tell you which file to use . -
Identify which Flash Version should be used for the “600 Clusters” in your system. Flash v10.5.6 should be loaded/running in the 600-Cluster or Mixed Cluster.
-
“635 Cluster” = 635-CPUs only > all 635-Controllers should run the compatible Flash version shown.
-
“600 Cluster” = 600-CPUs only > all CPUs in a 600-Cluster should run Flash v10.5.6.
-
“Mixed Cluster” = 600 & 635 CPUs > all CPUs in a 600 & 635 controllers to v10.5.6.
-
STEP-2: Identify which Controllers need to be Flashed (by Cluster)
The existing controllers (CPUs) could have a different version of Flash than the version your system is designed to use.
As you noticed in the previous step, the compatible Flash is based on the Cluster type (635/600/Mixed), you must determine which CPU Models need updating based on which Cluster they are in.
-
Controllers that have all 635 CPUs should run the system-compatible flash version
-
Clusters that have at least one 600 CPU should run Flash v10.5.6.
Therefore the solution is to identify, which clusters have controllers that need their Flash to be updated.
-
Open the Loop Diagnostics screen from the SG menu: select View > Loop Diagnostics.
-
In the Loop Diagnostics screen, select the Cluster Name and choose ‘Get Controller Info’ command
-
Click the Execute button to see the list of Controllers and their Flash Version.
-
Notice that the CPU Model# (4th column) and Flash Version (6th column) will be shown for every controller in the cluster.
-
For each Cluster, to identify which controllers need the Flash version update. Galaxy recommends you flash one controller at a time.
STEP-3: Update Flash for any Controllers that need Flashing (by Cluster)
Updating Flash includes loading Flash to the CPU and then updating the daughter boards of the panel. Galaxy does not recommend flashing the entire cluster. You should flash one controller at a time. When you are sure all the boards are updated, you can proceed to the next controller.
-
To open the GCS Loader Utility in System Galaxy, go to the Hardware Tree (go to View > Hardware Tree) .
-
Right-click on a Cluster and select Load from the menu.
-
In the GCS Loader window, select the EZ80 Flash tab to perform a flash update.
-
Chose the Cluster Name as appropriate.
-
Choose the Controller Name to be updated and click [Get Controller Info] to retrieve the existing flash information in the CPU. If you have chosen a controller that needs the CPU flash updated, then you will notice that the flash information displays a version different than your designated system-compatible version.
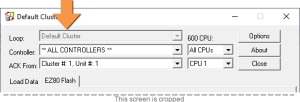
-
Choose the flash version from the appropriate droplist (635 droplist or 600 droplist) as needed.
a.) For a 635 Controller in an ‘All 635 Cluster’: Use the [635 s28 Droplist] to choose the system-compatible version of v11.
 Note: if the example screenshot shows a different version than your system-compatible version, then use your system version.
b.) For a 635 Controller in a ‘Mixed Cluster’: Use the [635 s28 Droplist] to choose the v10.5.6 Flash file.
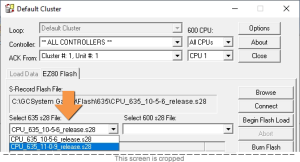
c.) For a 600 Controller: Use the [600 s28 Droplist] to choose the v10.5.6 Flash file.

-
Click the Begin Flash Load button and allow the Flashing process to fully finish.
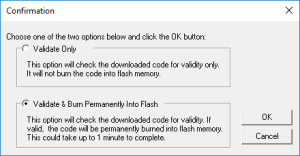
The software will pop up a message to Validate and Burn when the flashing is finished. -
Select the option to ‘Validate and Burn Permanently’ and click OK.
-
Click the [Allow Board Update] button to update flash to the daughter boards in the controller.
-
You can confirm/monitor that each daughter board has finished updating flash in the embedded Panel Status web-page.
TIP: Open the Panel Status page by entering the CPU’s IP Address into a web browser URL field. All daughter board flash versions should match the CPU version shown on the Panel Status web-page. Your browser (computer/device) must be on the same network segment as the controller. -
Test that the panel’s Tamper Switch is working for each controller by opening the panel door to trip the Tamper switch.
TIP: The CPU reports tamper events to the Event Monitoring screen in the System Galaxy software. After your panel is online and communicating with the Event Server, you can open the panel door to trip the tamper switch. -
OTHER TOPICS