Monitoring Events
This topic covers monitoring Live Events and sending User Commands - including configuring settings.
FEATURED TOPICS
Configure Events (Settings)
The first time the Live Events page is opened, you must configure which events to monitor. This is done in the Settings window (modal).
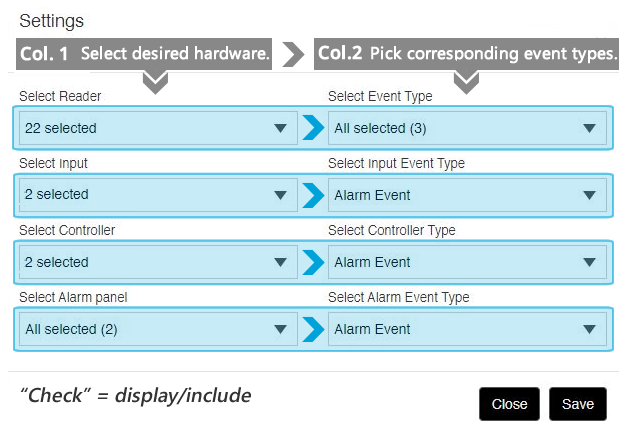
The Settings window lets the user choose which hardware devices* to monitor and configure which event messages to see in the Live Events page.
-
Checked = monitor the device* and its events when they occur.
-
Unchecked = do not monitor this device or event.
* Hardware devices include readers/doors, inputs, controllers, and third-party alarm panels.
PREREQUISITES & NOTES
-
(in the VMS system) User must have a valid VMS system login/account and camera permissions in order to view video from specific cameras.
- User must have appropriate permissions to view events and alarms.
-
You must enable the hardware Device you want to monitor in the Settings window.
-
You must enable the Event Types (types of messages) you want to see in the Settings window.
-
If you want to monitor armed inputs, you must configure the Alarm Events in the Alarm Activation window - See Alarm Events topic for more information.
OPEN THE EVENTS PAGE
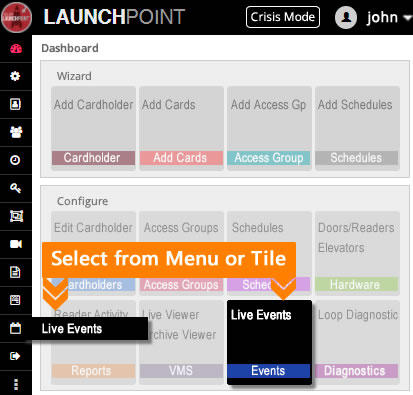
There are two ways to open the Live Events page ...
-
Side Menu: select "Live Events" option.
-
Dashboard: select 'Events' Tile (under Configure section)

OPEN THE SETTINGS WINDOW
When the Live Events page opens, the user can click the Settings button at the top-right corner of the Events page.

Note: No events will display if the user has never configured the event settings. After settings are configured, the appropriate incoming events will display as they happen in the system.
CONFIGURE EVENT SETTINGS
The Settings window allows user to choose which hardware devices to monitor and which event types to display.
STEPS
-
To open Settings window, click the Settings button in the Event page (top-right corner).
-
The hardware devices are listed are in column-1 and the event types are in column-2.
-
When you choose a hardware device, you must also pick the corresponding event types to see.

-
-
Select (check) any Hardware Devices from the 1st column that you want to monitor.
-
Each droplist all the hardware devices in your system (i.e., readers, inputs, controllers, alarm panels).
-
Use the "Select All" option to toggle the checkboxes (all on or all off ).
DEVICE DROPLISTS
-
Readers = list of all individual readers from every controller unit in the system.
-
Inputs = list of all individual inputs from every controller unit in the system.
-
Controllers = list of all the controllers in the system.
-
Alarm Panels = list of alarm panels in the system.
-
-
Select (check) any Event Types from the 2nd column that you want to see events from.
-
Each droplist in the 2nd column pairs with the corresponding droplist in the 1st column.
Each droplist contains a list of the events that pertain to the corresponding hardware in the 1st column.
-
Use the "Select All" option to toggle the checkboxes (all on or all off ).
EVENT TYPE DROPLISTS
-
Reader Events = check the desired types to see events from the selected readers/doors.
[choices are - activity events, alarm events, and 'not in system' events] -
Input Events = check the alarm event to see events from inputs.
-
Controller Events = check the alarm event to see controller events - such as controller online/offline, board online/offline, tamper, low battery, etc.
-
Alarm Panels = check the alarm event to see events from alarm panels in the system.
-
-
Click Save button to save your choices and close.
(the Close button will close the window without saving your changes.) -
RESULT: the system event messages that you selected should start logging from the hardware you chose.
EVENT MESSAGES
-
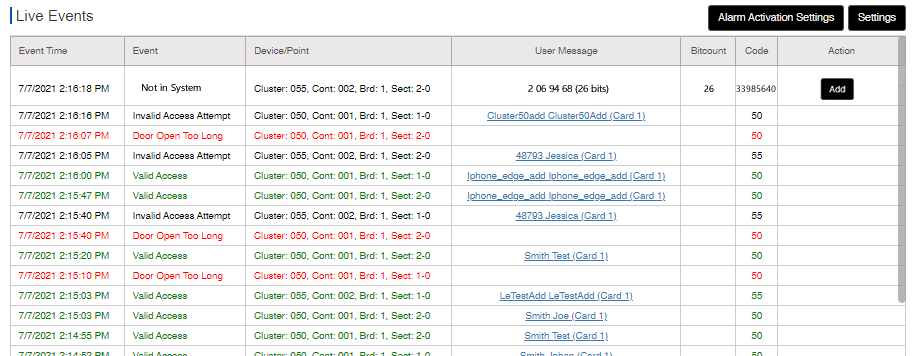
Invalid Access Attempt = access denied - card presented does not have access to this door.
-
Valid Access = access granted - card presented has valid access to this door.
-
Door Open too Long = the door contact was not closed before the reclose within timer expired.
-
Door Forced = door contact was opened without having a valid access granted.
See the main system programming guide for all types of events that are possible. -
Not in System = access card presented to the reader is not in the system.
See User Commands for more information on the Add button.> Note: to see NIS events, the "Not in System" Event Type must be "checked" in the Settings window.

-
Monitoring Live Events
The Live Events page allows the user to monitor live incoming events in a real-time capacity.
Events are continuously logged to the Events Page until user closes the page or the page connection times out.
STEPS
-
Open the Live Events page from the side menu or dashboard tile.

-
When the Events page opens, the live events will begin displaying based on the configured settings.

NOTE: User commands are available from the User Command menu. See below.
SETTING THE 'NUMBER OF EVENTS' PER PAGE
-
In the Events page, choose the number of events you want to display per screen.
there are 3 choices ... 100, 250, 500. -
In the Page Number field you can select which page you want to advance to.
-
Click the Go button to advance to the selected page.
OPERATOR COMMANDS
While the Live Events page is open and active, the user can issue user commands - described below.
There are two places to find user commands ...
-
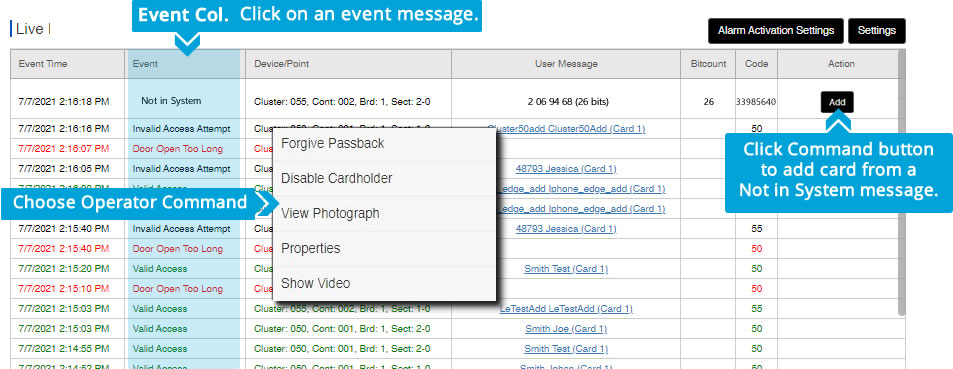
Command Menu: this is a popup menu that displays when the user clicks on the Event column of any incoming event message.
CAUTION: Be sure you are clicking the correct event, because the incoming event messages are continually popping in, which may move the position of your intended event.
NOTICE: the user commands are dynamically enabled/disabled based on the event type chosen.
-
Action Column: this last column can display a button or a link that performs a command operation - such as View Video (link) or the Add Card (button). These options only display on the appropriate event types.
NOTICE: the Show Video option is available in the command menu if the Action column has a button or other option occupying that space. If the Action column is free, you may see a View Video link in the Action column - both Show Video command option and View Video action link will open the VMS login page.

STEPS
-
Open the Live Events Page from the dashboard tile or sidemenu.
-
Single-click on any event message in the Event column. While live events are logging,
Note: If incoming events are actively logging, the next incoming event could "bump" your intended event down as you are clicking. Be careful to ensure you have selected the intended event.
-
When the command menu opens, a list of user commands will display.
(the Commands are dynamically enabled or disabled based on which type of event is chosen.) -
Select (choose) the appropriate command ...
LIST OF COMMANDS IN MENU
Open the Command Menu by clicking on the Event Column.
-
FORGIVE PASSBACK = releases a card from a passback violation.
-
DISABLE CARDHOLDER= disables the cardholder (system-wide) for the selected card.
-
VIEW PHOTOGRAPH = displays the cardholder photograph in a popup box.
-
PROPERTIES = opens the cardholder record of the person the card was issued to.
-
SHOW VIDEO = opens the VMS Page and displays video from the associated camera for the door or device in selected event. (User will be prompted to sign-in to the VMS system.)
_ _ _ _ _ _ _ _ _ _ _ _ _ _ _ _ _ _ _ _ _ _ _ _ _ _ _ _ _ _ _ _ _ _ _ _ _ _ _ _ _ _ _ _ _ _ _ _
-
VIEW VIDEO (Action Column)= this link opens the VMS Page and displays video from the associated camera for the door or device in chosen event. (User will be prompted to sign-in to the VMS system.)
-
ADD (Action Column)= this button allows user to add a card from a "not-in-systemevent".
More Info on Adding a "Not in System" Card: When a Not in System event logs to the Event page, it includes an ADD button. Clicking the Add button opens a message-box that lets the user add the card to the system.
> clicking [Add Card to Cardholder] will add the card to an existing cardholder.
> clicking [Add a Cardholder] will add the card to a new cardholder.
-