Add Access Group Wizard
task: Adding or creating a new access group with authorized doors and assigned time schedules.
featured topics
See Related Topics
Add Card Add Cardholder Cardholder Look-up Add Schedule Edit Access Groups Other Features
About the Access Group Wizard
The Add Access Group Wizard allows the user to choose the doors and time schedule that controls access cards.
- Proceed with Add Access Group Wizard (this topic) to add an access group to the system.
- To learn more about how access groups work, see Editing Access Groups.
PREREQUISITES & NOTES
-
The Time Schedules you need to assign must be created before you add the Access Group.
IMPORTANT - AVOID CREATING OVERLAPPING OR CONFLICTING ACCESS PRIVILEGES:
IMPORTANT - ABOUT UPDATING PANELS: Online panels should be updated when the access group is saved (or deleted from the system).
OPEN THE WIZARD
To open the Access Group Wizard ...
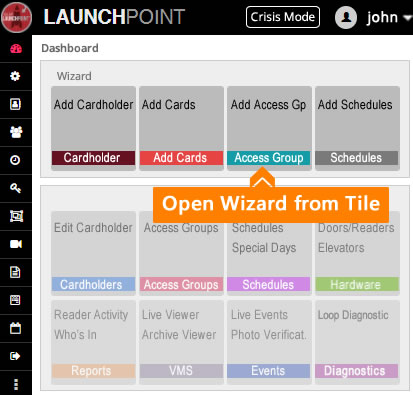
- Go to the Dashboard screen and click the Add Access Group tile, under the Wizard section.
- Or open the Access Group screen from the left side Menu, and click Add New button to launch wizard.
Click on thumbnails to open and close them.
![]() × Access Group menu icon
× Access Group menu icon
 × LaunchPoint Dashboard (thumbnail)
ADDING AN ACCESS GROUP
This section describes adding a new access group using the Access Group Wizard. If your access group already exists, use the Access Group Editor.
See Related Topics
Look-up a Cardholder Access Group Editor Time Schedule Wizard Other Wizards Other Features
STEPS
To open the Access Group Wizard ...
- Go to the Dashboard screen and click the Add Access Group tile, under the Wizard section.
- Or open the Access Group screen from the left side Menu, and click Add New button to launch wizard.
Click on thumbnails to open and close them.
![]() × Access Group menu icon
× Access Group menu icon
 × LaunchPoint Dashboard (thumbnail)
-
Open the Access Group Wizard by clicking on Add Access Group Tile.

-
Select a Loop/Cluster that you want to add an Access Group to.
-
Enter an Access Group name - (mandatory) create a name that is logical.
-
Click the Additional Fields checkbox- shows/hides additional fields.
-
When checked, the additional fields show.
-
When unchecked, the additional fields are hidden.
-
-
Access Group Number - system assigned number - is assigned when user enters the name.
-
Set the Crisis Mode Access Group- this affects how all the doors on the Loop behave during crisis mode.
-
Set the Activation Date/Time - sets a future activation date for the access group.
Note: The card will not work in the system until the date elapses. All associated cards are impacted.
-
Set the Expiration Date/Time - sets a future expiration date for the access group.
Note: It will not work in the system after the date elapses. Associated cards are likewise impacted.
-
Notes, Comments, and Service Comments fields - enter information at user discretion.
-
Extended Group checkbox - set this only if you want an extended access group.
-
When checked, the access group is treated as an extended group.
-
When unchecked, the access group is treated or behaves as a normal group.
-
-
Access Group Disabled checkbox - typically this is only used to disable an access group without deleting it.
-
When checked, the access group will not work in the system (or will stop working).
-
When unchecked, the access group will work in the system.
-
-
Click the NEXT button to advance the wizard screen.
-
Choose (click) a door in the Unauthorized List that you want to assign.
-
Click the Edit Schedule link in the Action column.
Result: This unlocks the 'Time Schedule' column so you can choose a schedule to assign to the selected door.
-
Select a Time Schedule for the Reader/Door.
PREREQUISITE: The desired Schedule must already exist - See the Add Schedules Wizard if you need to create a schedule.
-
Click SAVE in the Action column to link the schedule to the door/reader.
Result: This will move the door into the Authorized Readers List and link it to the chosen schedule.
NOTE: This access group will only grant valid access to the "authorized" doors only during "active" (green) time periods** of the linked schedule.
NOTE: Cards never have access to unauthorized doors**. And cards do not have access to authorized doors during "inactive" (gray) time periods**.
*IMPORTANT - OVERLAPPING ACCESS RULES *: Remember if any doors in this group are also members of another access group and both groups are assigned to the same card, then the system will grant access to the overlapping doors during the active times of either schedule. Meaning if one group starts active access at 8 am and the other group gives access at 6am - the card will have access starting at 6am because of the "overlapping schedules".
-
Repeat the steps above for each Door/Reader until you are satisfied with your choices.
Result: Doors that do not have a schedule will remain in the unauthorized list.
-
Click FINISH button to save the Access Group.
The browser may prompt you to confirm leaving the screen - say OKAY.
- LaunchPoint will return you to the Access Group Editor screen where you can preview your new Access Group.
- Note Clicking the Add New button lets you start another access group.
MODIFYING OR DELETING AN ACCESS GROUP
If you need to modify or delete an access group, use the Access Group Editor.
See Related Topics
Add Card Add Cardholder Cardholder Look-up Add Schedule Edit Access Groups Other Features
