Add Cardholder Wizard
TASK: Add (enroll) a new Cardholder to the system including adding the photo, access card, and assigning access permissions.
featured topics
Adding a New Cardholder (including requirements)
Adding Personal Data (inclu. Data Fields 2 - 4)
Adding More Data (Fields 5 -50)
FAQs : Enrolling a New Cardholder
About Adding Cardholder Information Later
See Related Topics
Add Card Cardholder Look-up Add Access Group Add Time Schedule Other Features
About Enrolling a New Cardholder
This section explains information about adding a Cardholder to the system in general, with some information specifically related to the cardholder wizard.
Enrolling a Cardholder includes adding personal data, adding a photograph, enrolling an access card, and assigning access permissions and/or an ID badge - at the user's discretion. The Add Cardholder Wizard allows the customer to customize the process according to client needs.
If you begin enrolling a cardholder and cannot finish all the fields, you have two choices ...
-
you can exit the Wizard without saving and restart the enrollment from the Cardholder Wizard when you have the information.
-
you can save what you have in the Wizard, then enter the remaining information from the Cardholder List (Cardholder Editor).
PREREQUISITES & NOTES
- The Access Group must already exist in the system before you can add it to the cardholder. See the Add Access Group if you need to add the group.
- You can enroll an access card during the Cardholder Wizard session, provided you know the card data.
- You can assign access permissions
- If you already added the cardholder name, see Cardholder List (Editor).
This section covers information about adding a new cardholder through the Cardholder Wizard.
The cardholder wizard is typically launched from the dashboard screen.
From the Dashboard:
Simply click the Add Cardholder tile to open the wizard.
The tile is located on under Wizards heading near the top of the screen.
× LaunchPoint Dashboard
From the Cardholder List screen:
Also, if you click the Add Cardholder button in the Cardholder List screen, the Cardholder Wizard will be launched .
× Cardholder List (thumbnail)
The user can only add or enroll a new cardholder through the Cardholder Wizard screen.
To add a new record in the system, you must satisfy "required" fields, such as the name field. The wizard will not allow the user to save a record or leave a screen until the required field is satisfied.
NOTE: Any unsaved discretionary data will not be saved if the user aborts/cancels the wizard.
Fields that are normally optional or discretionary can be configured to behave as mandatory by the system administrator. Mandatory fields are designated with a red asterisk. The user must satisfy any fields that have been designated as "mandatory" by the system administrator before advancing to the next screen.
The Cardholder Wizard allows the user to add different types of information, such as a photograph, access card, access permissions, or a badge template. Although this information is discretionary, key fields are "required" if the user begins programming an option.
The wizard will prompt the user to satisfy the missing information and highlight the fields with a red border. The user cannot advance or save until the missing information is satisfied or the user removes the partial information.
NOTE: All the system rules apply concerning required, mandatory, conditionally required, and discretionary fields. If you begin adding a card, you must satisfy any conditionally required fields or remove the card programming to skip it.
The Cardholder Wizard allows the user to add or omit different types of information, such as a photograph, access card, access permissions, or a badge template.
Optional and discretionary fields are performed at the user discretion if the information is readily available, or as a matter of the enrollment policy of the system owner (i.e. the company that operates the system).
If the information is not required by policy, or if it is not available at the moment of enrollment, then the user can opt-out or skip the fields in the wizard. Most data fields are optional in the Cardholder Wizard.
NOTE: You can add optional or discretionary data later in the Cardholder Editor.
If you skip optional and discretionary fields during the Wizard session (such as photograph, card, permissions, badge, etc.), you can always add this data later in the Cardholder Editor screen.
× Cardholder Editor (thumbnail)
The Cardholder record must have been saved before you exit the wizard in order to find and open the cardholder in the editor screen.
NOTE: the cardholder is automatically saved when the user advances the wizard from the Cardholder Information screen by pressing the Next button in the wizard.
All the system rules apply concerning required, mandatory, conditionally required, and discretionary fields.
Adding a Cardholder
You must add a First name and Last name in order to create (save) a new cardholder.
Other fields are considered discretionary, based on the enrollment policy -- meaning whether or not you are adding a photograph, a card, a badge, and additional information.
REQUIREMENTS
- First and Last names are required, plus any custom-designated mandatory fields and conditionally required fields (these are marked with red asterisk). User cannot save until the required fields are satisfied.
- If you are adding a card, you will need to know the access card code.
- To assign access permissions, the access groups must already be created.
- To assign a badge template, the badge template must already be imported into the system.
- To print a badge you must go to the Cardholder Editor.
- If you exit the wizard prematurely or skip items, you can use the Cardholder List to look up the person and finish the task in the Cardholder Editor screen..
OTHER TIPS
Contact your administrator or authorized dealer with questions about access locations, access profiles, departments, customized data fields, badge templates, or questions related to VMS or Badging license.
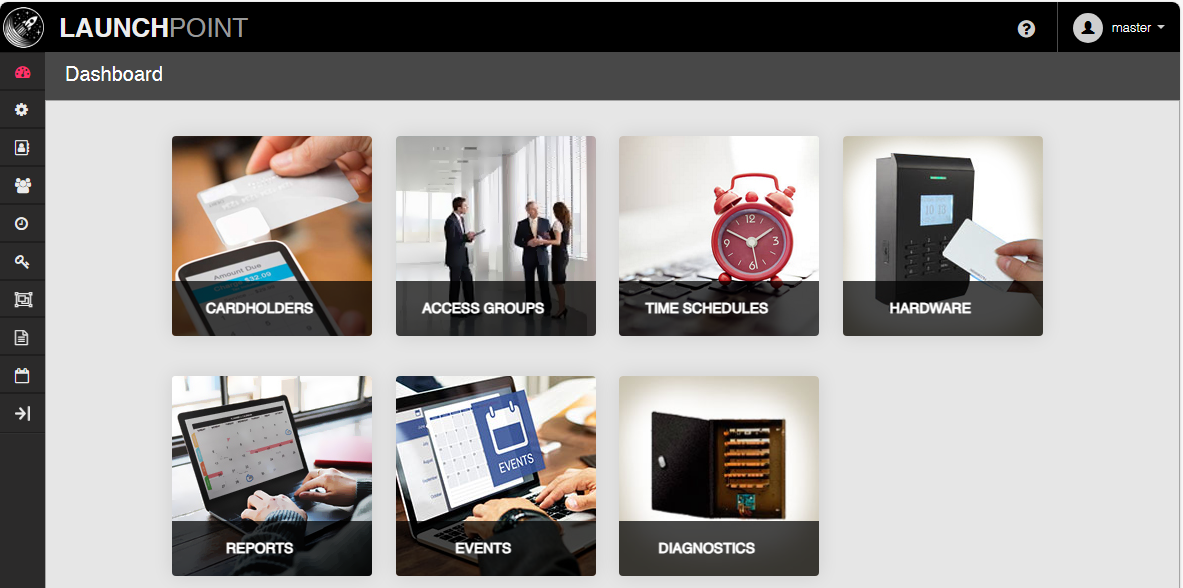
To add a new cardholder from the Cardholder Wizard, you must launch the Wizard. The first screen of the Wizard is the Cardholder information screen.
× LaunchPoint Dashboard
× Cardholder Wizard - Information screen
-
Sign-in to LaunchPoint and go to the Dashboard page.
-
Click Add Cardholder Tile on the Dashboard to open the wizard (see above screenshot).
-
In the Cardholder Information window, enter First and Last Names (mandatory)
-
Choose a customer name from the Customer droplist as appropriate.
(“No Customer” is the default in some systems, while cloud systems may be defaulted to their own client name. )
-
Choose a department name from the Department droplist as appropriate.
-
Click on the D.O.B. field to enter a date using the calendar function.
-
Click on Date 1 or Date 2 fields and enter a date as appropriate using the calendar function.
(the date-1 and -2 fields can be used for any date at the discretion of the system subscriber – like date of hire.)
NEXT : Do one of the following things to proceed ...
-
click Additional Fields checkbox to open more fields (opens the Additional Fields section).
-
click Data Fields 5-50 to open more fields (opens the Data Fields 5-50 window)
-
click Sync Template button to synchronize badge templates.
-
click FINISH button to save the cardholder now and exit the wizard (without adding a photo or access card, etc.).
-
click NEXT to advance to the next screen (should be the Add Photo window).
These fields are optional or discretionary unless your administrator has configured them to be mandatory in the system.
-
A mandatory field will be red and have an asterisk (*) beside it. It cannot be skipped - the screen will not advance until it is satisfied.
-
You can configure optional/discretionary fields later in the Cardholder Editor screen if you want to skip them now in the wizard.
NOTES
- Some grayed/disabled fields are locked by your system administrator or by the system.
- Some grayed fields will be auto-filled by the system after the cardholder is enrolled; such as Last Access, Date Added, Last Modified.
- Contact your administrator for questions regarding configuring Data # field names.
- All 50 Data fields should always be used consistently for reporting and administrative purposes.
Adding Additional Information
× Additional Fields screen
- If Record Type droplist is available/unlocked in your system, you can choose the appropriate option.
- The User can enter the personnel data as required by administrative policy, such as email, address, home phone, etc.
- The User can also enter data into the Data 1, 2, 3, and 4 fields. These extra fields are provided for the administrative needs of the client.
- The Inactive checkbox should remain unchecked if you want the cardholder to be active. Checking this field will prevent the card from working at any door.
NOTICE: the Inactive option controls whether a Cardholder is active in the system. This is a quick way to disable all credentials for a single person. All access credentials assigned to this cardholder record will stop working if this option is checked. This does not affect credentials assigned to another cardholder record.
TIP: There are additional ways to control the activation of an access card in the system. You can configure the active date of an access card (credential) in the Add Card screen, in a later step in this wizard. You can also disable the access card, or you expire it in the Add Card screen.
NEXT : Do one of the following things to proceed ...
-
click Data Fields 5-50 to open more fields (opens the Data Fields 5-50 window)
-
click Sync Template button to synchronize badge templates.
-
click FINISH button to save the cardholder now and exit the wizard (without adding a photo or access card, etc.).
-
click NEXT to advance to the next screen (should be the Add Photo window).
These fields are optional or discretionary unless your administrator has configured them to be mandatory in the system.
-
A mandatory field will be red and have an asterisk (*) beside it. It cannot be skipped - the screen will not advance until it is satisfied.
-
You can configure optional/discretionary fields later in the Cardholder Editor screen if you want to skip them now in the wizard.
NOTES
- The 50 Data fields are all discretionary fields and should always be used consistently for reporting purposes.
- Contact your administrator for questions regarding configuring Data # field names.
Adding Data in Fields 5 - 50
× 50 Data Fields screen
-
When User clicks the Data Fields button, the 50 Data Fields screen opens.
-
The User can enter data into any of the Data 5-50 fields. These extra fields are provided for the administrative needs of the system subscriber.
NOTE: The system does not impose rules on these fields unless the integrator has configured them to work a certain way (i.e. as a droplist or as a mandatory field). Be careful to use these fields in a consistent way for reporting purposes. -
Click CLOSED or DONE to save your changes.
(this returns user to the Cardholder Information screen.) -
From the Cardholder Information window, click the NEXT button to advance to importing a photograph.
The main photograph is typically used for (A) printing a Photo ID Badge or (B) using the Photo Identification/Verification feature.
Adding a main photograph is optional. You can save the Cardholder enrollment without it unless the Sys-Admin has made it mandatory.
You can add the photograph later in the Cardholder Editor screen if you need to skip adding it in the Express Add or Cardholder Wizard screens.
NOTES
- You must already have captured the photograph you wish to upload.
- The photograph file must be in a folder location that the SG User has permission to access.
Adding a Photograph
× Add Photo Y/N message box
× Upload Photo screen
-
LaunchPoint will open a message box : “Do you want to upload a cardholder image?”
-
Click NO only if you want to skip adding a photograph.
-
Click YES to add a cardholder photograph;
The Import Photo screen will open showing two empty frames.
The left frame is used to import and crop the photo.
The right frame will hold the finished photo after the user crops the desired area of the image
-
-
Click the Folder icon to browse to the desired photograph file. The folder icon is in the upper corner of the left frame.
-
When the photograph is loaded into the frame, the user will see some overlay controls.
The user can zoom-in or zoom-out by using the overlay controls.
The user can also click-n-drag the photograph to adjust the position of the photo within the frame.
-
Click the CROP button to create the official cardholder photo image. The photo image will pop into the photo frame on the right side.
-
Click SAVE button to save your changes and advance to the Add Access Card screen.
This step is required to create a valid access card.
-
If you are not ready to assign an access card right now, you can SKIP this section or Exit the wizard.
-
If you do not save card data, you can simply use to the Add Card Wizard to add the card later.
-
If you have at least saved the first and last name of the cardholder, the cardholder and any saved programming will be in the system. This can be found from the Cardholder List (cardholder editor) screen.
NOTES
- You must correctly enter the card ID code and any facility code or company code needed for the card to work correctly.
- You can set a future activation date if you don’t want the card to be active immediately.
- The Disable Card checkbox will disable only the card you are programming and will not affect other cards on the same cardholder.
Access Card Data
× Add Card Data screen
- Enter the Card Description if desired - (recommend using default system description)
- Select the appropriate Card Technology such as 26bit Wiegand.
- Enter the Card Code, including ID Code and Facility code as appropriate for the technology type.
- Enter PIN Code if applicable.
- (optional) Check the Additional Fields checkbox if you need to change the card role or set the active or expire date for the card.
- (default) Select the correct Card Role of the card. (access card is default; set to alarm card if needed.)
- (optional) Set the future Activation Date/Time as appropriate.
- Set the Expiry Mode as appropriate and choose the appropriate value for the expiration.
- Select a Badge Template for the cardholder. (only used if you are printing ID Badges)
- Select a Dossier Template as needed. (only used if you are printing Dossiers)
- Click NEXT to advance
This step is required to create a valid access card.
If you are not ready to assign access privileges right now, you can exit the wizard. However you must complete the task of assigning access privileges later in the Cardholder Editor. See Editing Cardholder for more information.
IMPORTANT
- You must choose at least one Location.
- You can choose multiple Locations as desired.
- You can also add more locations later in the Cardholder Editor screen.
Choosing an Access Location
× Select Location screen
- Select a Location (or multiple locations by clicking and holding the control key while clicking more Locations.)
- Click the Next button to advance.
This step is required to create a valid access card.
If you are not ready to assign access privileges right now, you can exit the wizard. However you must complete the task of assigning access privileges later in the Cardholder Editor. See Editing Cardholder for more information.
TIP: The best way to work through assigning the access rules is to select each authorized loop (one at a time) and set up its access rules. Then set up the next Authorized Loop, working in turns until they are all configured.
IMPORTANT NOTES
- You must have already created the Access Groups before you can assign them.
- You must assign at least one Authorized Loop (Location) to the card for it to work.
You can assign multiple Authorized Loops (Locations) to the card/credential. - You must assign at least one Access Group to an Authorized Loop for it to work.
You can assign multiple Access Groups to a selected Location (Authorized Loop). - Assigning "no access" to all access groups will disable the access permissions for that Location/Loop.
- If you assign "unlimited access" to any group on a Location/Authorized Loop, the card will have access to all doors on that loop, all the time (24/7).
Assign Access Permissions (per Loop)
× Assigning Access Permissions screen
× Add Another Card ? - Y/N message box
× Successfully Saved confirmation message
- Select the first Authorized Loop that you want to configure. If you have multiple Loop-Clusters chosen for this card, you will configure them separately.
TIP: the Authorized Loop field is beneath the Access Profile field. - Assign the Access Permissions by assigning an Access Group(s) as needed. The access rules you assign here are associated with the selected Authorized Loop, and will be applied to the access card. Now your new card will have access to the selected loop for the days/times covered in the access group(s).
TIP: You can assign multiple Access Groups to the card for the selected Authorized Loop. - Repeat steps 35 and 36 for each additional Authorized Loop until you have them all configured.
- Click the Next button when you are sure you have finished the card access assignment.
- LaunchPoint will ask if you want to add another card.
If you click YES, you will return to the Add Card screen.
- Click NO when you do not want to add any more cards.
LaunchPoint will automatically save the Cardholder record. - Click CLOSE to acknowledge the save confirmation.
At this point you have enrolled the cardholder. And if you entered photo, card data, location, access permissions, that data also has been saved.
If you skipped any information, you can open the Cardholder List to search for your new cardholder and finish editing the cardholder record - like adding a badge or printing a badge.