Editing Time Schedules
This topic covers configuring an existing Time Schedules.
FEATURED TOPICS
How to Edit Special Days (Holidays)
About Editing Schedules
In the Time Schedule Editor, you can modify or delete an existing schedule or special day (holiday).
- You can ADVANCE /SKIP AHEAD TO INSTRUCTIONS in the next section as appropriate.
- Use the Add Time Schedules to Wizard to add a new access group.
PREREQUISITES & NOTES
- The user must have permission to edit schedules and special days.
- The time schedule you wish to edit must already exist in the system.
- If you have not added the schedule, see the Time Schedule Wizard.
- A schedule will not function in the system if it does not have the time periods properly configured for each day.
- Special Days (holidays) are optional.
Crisis Mode Notice: Typically, crisis mode uses a default system schedule (always or never). However, if you are creating a custom schedule for use in crisis mode field, you should take care to reserve the schedule for crisis mode use only. Do not cross up custom crisis schedules with normal scheduling of doors or other hardware.
Time Schedules are created at the Loop/Cluster level in the system. This means they can be assigned to any access group (authorized door) within the same loop/cluster - - which is done through the access group programming. They cannot be used on access groups or doors in other loop/clusters.
Schedules have two states, "active" (green) and "inactive" (not green).
- During the "active"(green) state, a valid card can be granted access.
- During the "inactive"(gray/red) state, a valid card will be denied access.
The schedule is not assigned directly to the access card. Instead it is assigned to a door in an access group. The access group is assigned to the card. This way the cardholder can present the card to a door and the schedule will determine if the cardholder has access.
See Access Groups Explained for more info on access groups.
When the schedule is saved, it is added to the panels in the Loop. An offline panel must be brought online to update the schedules.
When creating a time schedule, you can decide whether the schedule will include holidays/special days.
The Special Days/Holidays can be programmed to affect a half-day, a whole-day, or any portion of the day that is needed.
-
Half-Day Example: If you want a half-day (close-early), you could make the special day "active" in the morning, but "inactive" in the afternoon. When this day type is assigned to the calendar day, it will override the normal schedule and access will be denied for the afternoon hours.
-
Whole-day Example: If you want a whole day closed, you would make the special day "inactive" (gray/red) all day. Whenever this day type occurs on the yearly calendar, it will override the normal schedule and access will be denied instead of granted for that whole day. The system will return to the normal schedule on the next day or first day after the .
Once the schedule is created, it must be assigned to a door/reader in an access group. Then the access group is assigned to the card/cardholder. This will allow the cardholder to gain access at the "authorized doors" during the "active" (green) days and times of the assigned schedule.
The access card is denied access to all "unauthorized" doors (doors with no schedules). The access card is also denied access at "authorized" doors during any days or times that the assigned schedule is "inactive" (not green).
Bottom line, the door must be authorized and the schedule must be active (in the assigned access group) to grant access to a card.
Modifying the schedule will change the access permissions in the access control panel. Any changes made to the schedule should take effect when the schedule is saved. All cards/cardholders that are assigned to the affected access group will be immediately affected when the changes are saved/loaded to the panel.
Deleting a time schedule removes it from the access control panels in the same Loop (location). Deleting a schedule does not delete the access group, but it will render any assigned doors to the unauthorized status.
The access groups remain in the system, but they are no longer assigned to the deleted schedule. Access cards also remain in the system and assigned to the access group, but they will be no longer have access to any unauthorized door.
IMPORTANT NOTICE ABOUT UPDATING PANELS: Online panels should receive the updated changes when the schedule is saved or deleted from the system. Offline panels continue using the known schedules until the panels are brought back online and loaded with the new changes. Once the data is loaded to the panels, all changes are effective immediately for associated cards.
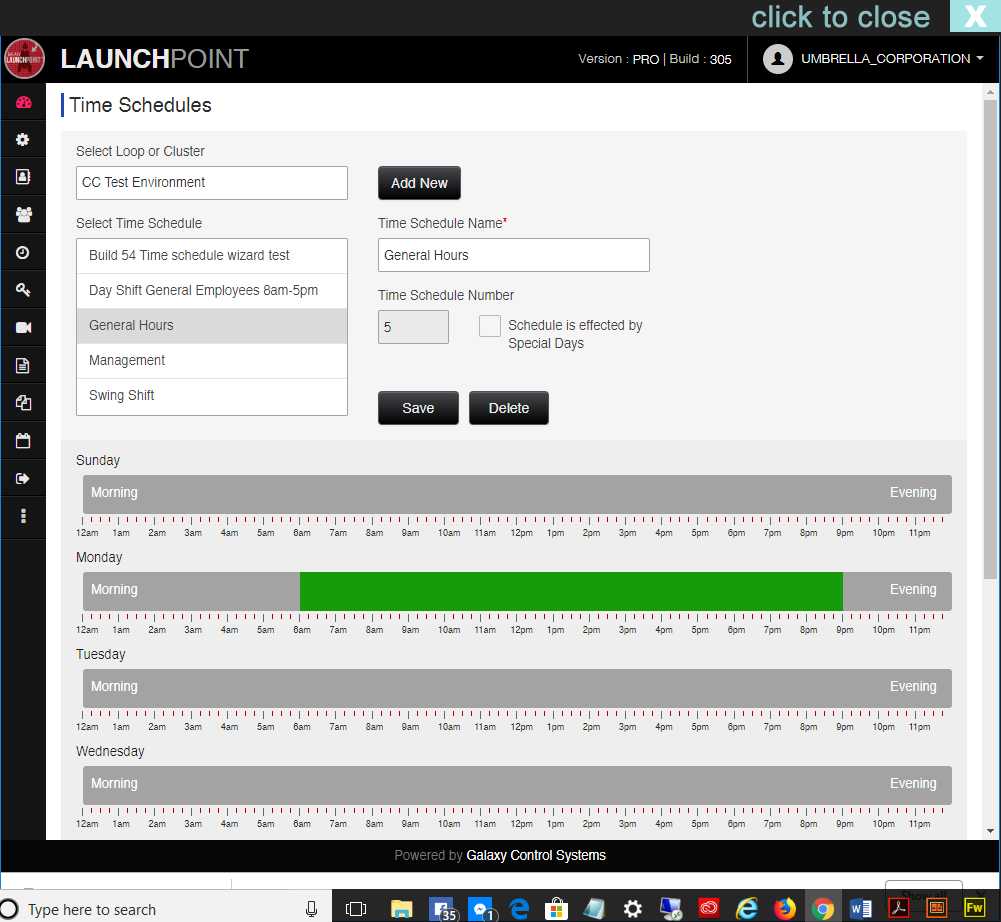
In the Time Schedule Editor, you can change the following things ...
- change the Schedule Name (the name change is effective system-wide)
- change the start and end times for the active(green) and inactive(gray) time periods
- change which special days affect the schedules
- delete the entire schedule
These changes are effective system-wide when the schedule is saved.
This section describes the capabilities of the Time Schedule Editor which support editing the time periods and special days (holidays).
If you need to add a new time schedule, see the Time Schedules Wizard.

Click/tap to enlarge image or reduce image.
Prerequisites and Notes
- The time schedule you wish to edit must already exist in the system.
- If you have not added the schedule, see the Time Schedule Wizard.
- A schedule will not function correctly in the system if the time periods are not properly configured for each day.
- Special Days (holidays) are optional.
Navigation Controls and Buttons ...
This wizard essentially has one screen. It makes a difference whether you are adding a new schedule (add new) or if you are selecting an existing schedule to edit.
- Add New - opens the Time Schedules Wizard where you can add the name of the new schedule.
- Save - saves the schedule and any modifications.
- Delete - deletes the selected schedule from the system.
- Affected by Special Days (cbx control) - shows/hides the time period controls below the week days.
TIP: Adding special days (holidays) is up to the discretion of the system subscriber. If your schedule needs to work the same way all the time (365-days a year) then do not configure special days. This could be true of a schedule that is assigned to hardware or to emergency personnel who may be immune to holidays.
In the Add Time Schedule Wizard, you can enter the following information ...
- choose an existing Loop/Cluster
- enter a time schedule name *
- show/hide the time periods for special days (holidays) **
- configure the start and stop times for each week day.
- configure the start and stop times for time schedules.
* A system number will be assigned to the schedule when you exit the Schedule Name field.
** Configuring special days is optional - up to subscriber discretion.
How to Open Time Schedules Editor
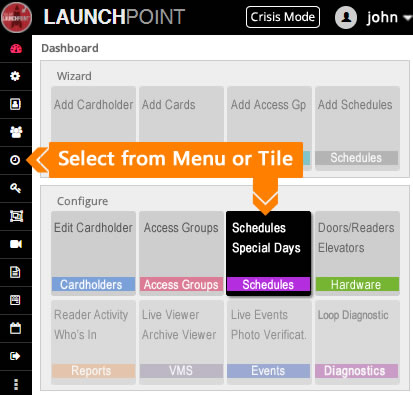
There are two ways to open the time schedules Page ...
-
Side Menu: select "Time Schedule" menu icon.
-
Dashboard: select 'Time Schedule Tile' (under Configure section)

Click/tap thumbnail to enlarge.
 × Time Schedule Editor
How to Edit Time Schedules
See the TIME SCHEDULES EXPLAINED ... if you are new to schedules.
OPEN THE EDITOR
Click the Schedules icon from the left side Menu.
![]() < Time Schedule menu icon
< Time Schedule menu icon
 × Time Schedule Editor
STEPS
-
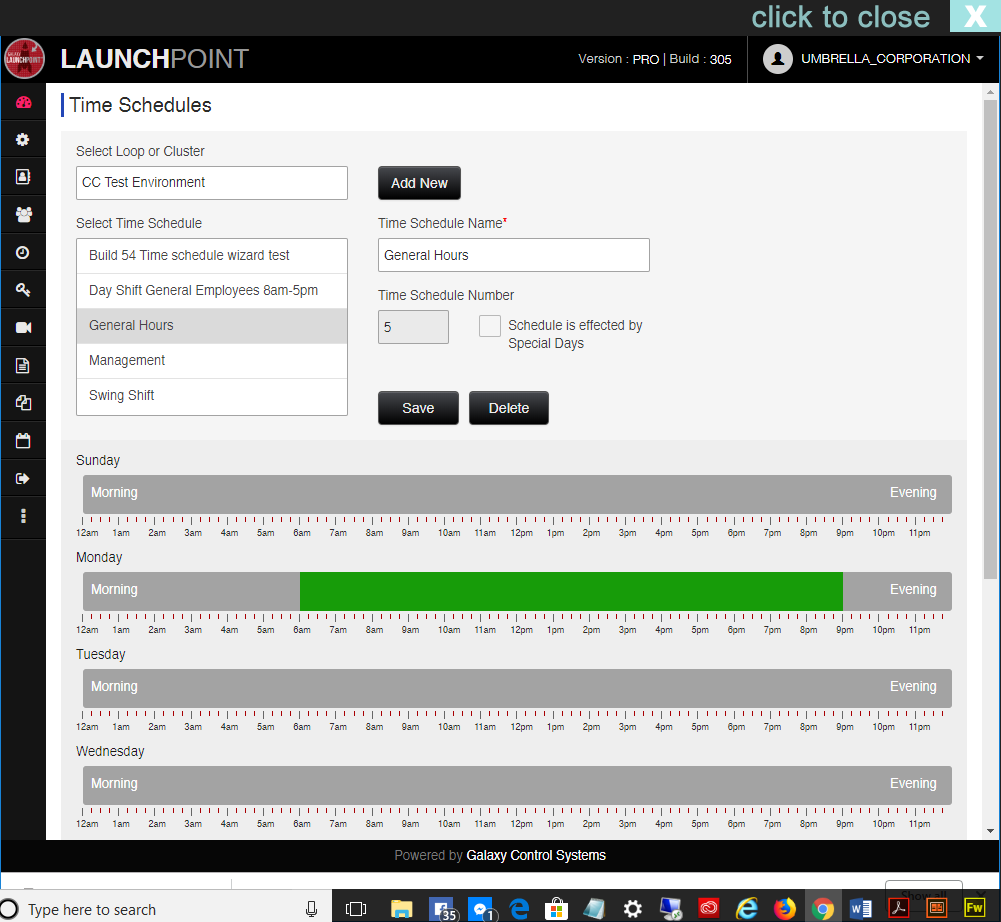
Select the Loop/Cluster (Location) that the Schedule belongs to.
-
Select the Schedule Name (from list view) - the name field will populate
-
Schedule name - you can edit the name as desired. This will propagate throughout the system.

-
Schedule Number - system assigned number - is assigned when user enters the name.
-
Schedule affected by Special Days cbx - determines whether schedule will work on holidays.
When checked, the holidays can be configured. The holidays time periods appear.
When unchecked, the holiday time periods cannot be seen or configured. -
Click on any Time Period Bar to program the active time periods (weekdays Sunday thru Saturday)
If the Time Bar is all gray, click it if you want to add a time period.
If the Time Bar has some green, click it if you want to change the time periods.
Green = active/on. Gray = inactive/off.
-
In the Set Time Schedule window, you can add or change the start times and stop times for the Time Period of the selected weekday (M-F, S/S) ...
-
for the Start Time, choose the hours and minutes > this sets the time when the active period begins.
-
for the Stop Time, choose the hours and minutes > this sets the active time period on the chosen weekday.
-
(optional) you can add another set of start/stop times to the same weekday by clicking the Green Plus button - as needed.
-
(optional) you can remove a set of start/stop times by clicking the Red X button - as needed.
-
click the SAVE button to save your time periods for the selected weekday.
clicking the Close button will exit the Set Time Schedule window without saving any changes.
-
-
Repeat step 6 and 7 for each day's time period bar.
-
Click the SAVE button to save your schedule. .
-
Continue to the next section if you "checked" that this Schedule is Affected by Special/Holidays.
OTHER BUTTONS
Add New button lets you open the Schedules Wizard to add a new schedule.
Delete button will delete the entire schedule. User will be prompted to confirm this choice.
Associated cards will no longer work at doors that were assigned to a schedule that is deleted, but the access group will remain intact.
Configure Holiday Day Types (Special Days/Holidays)
In the system, a special day or Holiday is simply a calendar day (date) that uses a different schedule than the normal days. The Holiday or Special Day must be programmed by the system administrator. However your schedule will not deviate on those days unless you configure the day-type hours for that Holiday.
For example: On a normal day your building is open 8am to 5pm. But on a Holiday your building may operate on different hours.
So when you configure your schedule, you also need to create the Day Types you will need to use.
-
closed all day (nothing is active)
-
open a half-day (active morning only)
-
open a half-day (active afternoon only)
-
open extended hours (active until 10pm)
OPEN THE SCHEDULE EDITOR
Click the Schedules icon from the left side Menu.
![]() < Time Schedule menu icon
< Time Schedule menu icon
× Schedule Editor (top half of page)
× Special Days (bottom half of page)
STEPS
-
If needed, Select the Loop/Cluster (Location) and the Schedule Name (from list view)
-
Place a checkmark in the Schedule affected by Special Days checkbox.
When checked, the holiday day-types will appear and you will need to configure them - in the way you want them to affect your schedule.
When unchecked, the holiday day-type time periods cannot be seen or configured. -
Click on a Holiday Type 1 thru 9 to open the Set Time Schedule window.
-
When the Set Time Schedule window opens, you can add or remove time periods as needed.
-
click the Green Plus (add) to add a new active time period to the Holiday type.
-
click the Red X (Delete) to remove any unwanted time periods from the Holiday type.
-
Remember if you want the Holiday Type to be closed/locked all day, then you do not want to add any active time periods.
-
-
Choose a start time and stop time (Hours/Minutes) in the Set Time Schedule window.
The time between the start and stop time will be green.
Green = "active"(open/unlock, or grant access). Gray = "inactive"(closed/locked, or deny access) -
Click the SAVE button to save your time period for the Holiday Type.
Clicking Close will exit the window without saving any changes to the Holiday Type.
-
Repeat these steps for each Day Type you need to create.
-
When you are finished, click the SAVE button to save your schedule.
Next Steps
Once you have created the needed Schedules, you can assign them to a door in the Access Group programming or to other places - such as a crisis mode field if you made a crisis schedule.